Java单列集合
集合介绍 在前面已经使用了一个最基本的数据结构:数组,但是数组的缺点很明显:定长,这个缺点导致数组的增删不够方便,为了解决这个问题,可以使用Java的相关集合
Java集合分为两种:
单列集合:集合中每一个元素只有一种元素类型 多列集合:集合中每一个元素包括两种数据类型,第一个数据类型对应的元素被称为key,第二个数据类型对应的元素被称为value,二者组成的共同体被称为键值对 Java集合有以下三个特点:
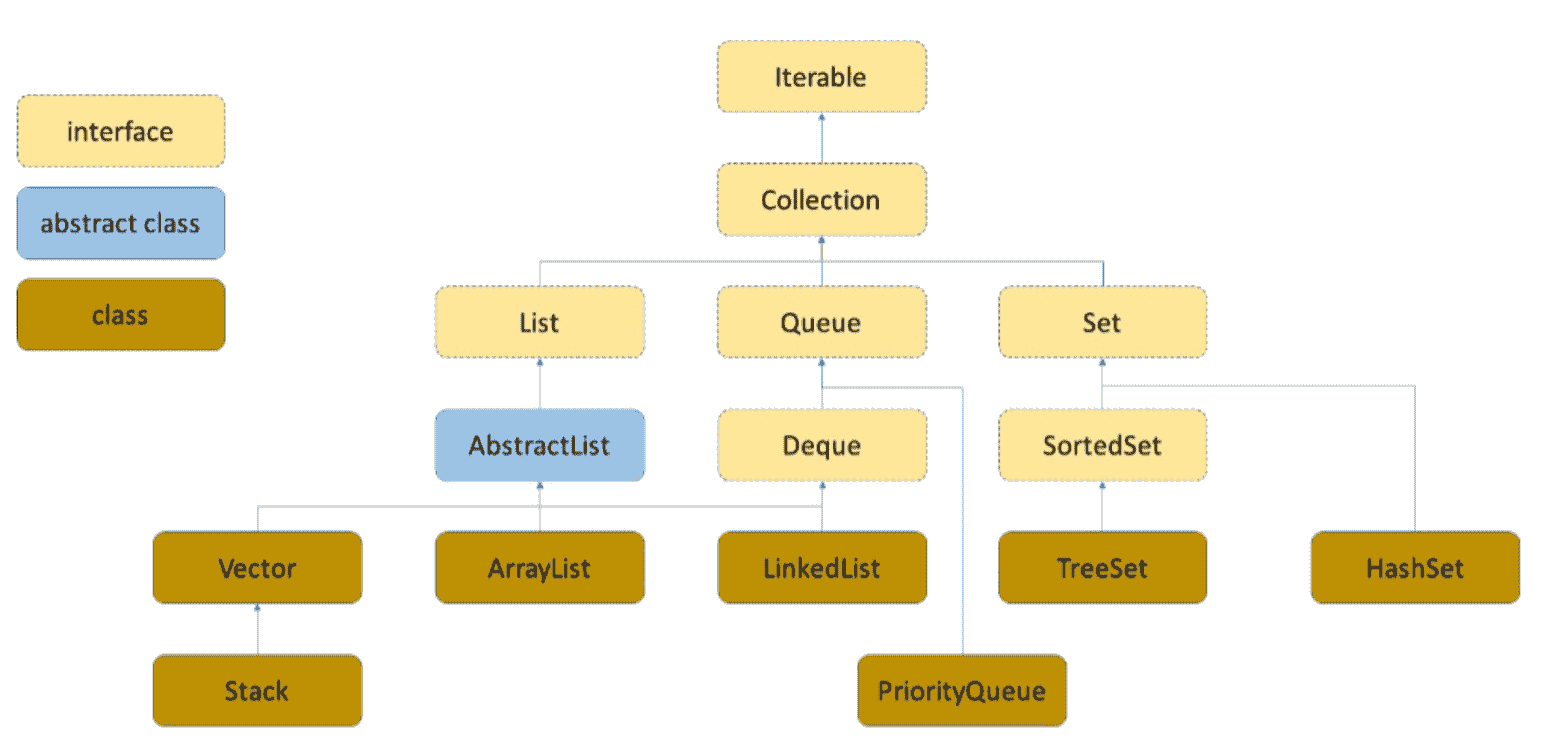
只能存储引用数据类型的数据,而不能存储基本数据类型的数据 每一种集合长度均是可变的 集合中有很多使用的方法,便于调用 单列集合分类 在Java中,单列集合最大的接口是Collection接口,该接口下有三个子接口,分别是List接口、Queue接口和Set接口
对于List接口来说,一共有四个实现类:
ArrayList类LinkedList类Vector类(现不常用)Stack类,继承自Vector类 除了Stack类以外,其余三个实现类都具有以下特点:
元素存储顺序与插入顺序一致 集合中元素可重复 可以使用索引方式操作 三个实现类中,ArrayList类和Vector类底层的数据结构是数组,LinkedList类底层的数据结构是不带头双向不循环链表,并且只有Vector类是线程安全的类,但是Vector类的效率低。而Stack类实现的就是栈结构
对于Queue接口来说,一共有两个实现类:
PriorityQueue类:底层数据结构是堆LinkedList类:底层数据结构是双向链表
对于set接口来说,一共有三个实现类:
HashSet类LinkedHashSet类TreeSet类 三个实现类都具有以下特点:
不可以添加重复的数据,即元素唯一 不可以使用索引方式操作 线程不安全 三个实现类中,HashSet类底层数据结构是哈希表,LinkedHashSet类底层数据结构是哈希表+双向链表,TreeSet类底层数据结构是红黑树,并且对于HashSet来说,其插入的数据在结构中的顺序与插入时的顺序不一定相同,对于LinkedHashSet类来说,插入的数据在结构中的顺序与插入时的顺序相同,对于TreeSet类来说,因为红黑树会按照一定比较方式对插入顺序进行排序,所以数据在结构中都是在一定规则下有序的
总结如下图所示:
Collection接口创建Collection实现类对象 Collection接口是单列集合的顶级接口,创建对象时使用对应的实现类创建,但是可以使用Collection接口的引用接收,即多态,基本格式如下:
Java Collection < E > 对象名 = new 实现类对象 < E > ()
Note
其中<E>表示泛型,Java中的泛型只可以写引用数据类型,所以导致集合只能存储引用数据类型的数据
使用泛型时,赋值符号左侧的部分必须写具体类型,但是赋值符号右侧的部分可以省略,JVM会自动根据左侧泛型的具体类型推导右侧部分
常用方法 Note
注意,下面的方法本质使用的还是实现类中重写的方法
boolean add(E e):向集合中插入元素,返回值表示插入成功(true)或者失败(false),一般情况下可以不用接收boolean addAll(Collection<? extends E> c):将另一个集合元素添加到当前集合中(相当于集合的合并)void clear():清除当前集合中所有的元素boolean contains(Object o):查找对应集合中是否含有指定元素,存在返回true,否则返回falseboolean isEmpty():判断集合是否为空,为空返回true,否则返回falseboolean remove(Object o):从当前集合中移除指定元素,返回值代表删除成功或者失败int size():返回集合中的元素个数Object[] toArray():将集合中的数据存储到数组中 基本使用如下:
Java 1
2
3
4
5
6
7
8
9
10
11
12
13
14
15
16
17
18
19
20
21
22
23
24
25
26
27
28
29
30
31
32
33
34
35
36
37
38 public class Test {
public static void main ( String [] args ) {
Collection < String > collection = new ArrayList <> ();
//boolean add(E e)
collection . add ( "萧炎" );
collection . add ( "萧薰儿" );
collection . add ( "彩鳞" );
collection . add ( "小医仙" );
collection . add ( "云韵" );
collection . add ( "涛哥" );
System . out . println ( collection );
//boolean addAll(Collection<? extends E> c)
Collection < String > collection1 = new ArrayList <> ();
collection1 . add ( "张无忌" );
collection1 . add ( "小昭" );
collection1 . add ( "赵敏" );
collection1 . add ( "周芷若" );
collection1 . addAll ( collection );
System . out . println ( collection1 );
//void clear()
collection1 . clear ();
System . out . println ( collection1 );
//boolean contains(Object o)
boolean result01 = collection . contains ( "涛哥" );
System . out . println ( "result01 = " + result01 );
//boolean isEmpty()
System . out . println ( collection1 . isEmpty ());
//boolean remove(Object o)
collection . remove ( "涛哥" );
System . out . println ( collection );
//int size() :返回集合中的元素个数。
System . out . println ( collection . size ());
//Object[] toArray()
Object [] arr = collection . toArray ();
System . out . println ( Arrays . toString ( arr ));
}
}
迭代器 基本使用 当需要遍历一个集合时,最常用的就是迭代器,在Java中,迭代器是Iterator<E>接口,获取当前集合的迭代器可以使用Collection中的方法:
常用的方法有两种:
boolean hasNext():判断集合中的下一个元素是否存在E next():获取下一个元素,其中E由创建集合时的数据类型决定 基本使用如下:
Java 1
2
3
4
5
6
7
8
9
10
11
12
13
14
15
16
17
18 public class Test01 {
public static void main ( String [] args ) {
Collection < String > list = new ArrayList <> ();
list . add ( "a" );
list . add ( "b" );
list . add ( "c" );
list . add ( "d" );
// 使用迭代器遍历
Iterator < String > iterator = list . iterator ();
while ( iterator . hasNext ()) {
// 存在下一个元素就更新
String next = iterator . next ();
System . out . println ( next );
}
}
}
需要注意,尽量不要在遍历过程中使用多次next()方法,不同情况下可能结果不一样,当next()方法没有访问到指定的数据,此时就会抛出异常:NoSuchElementException
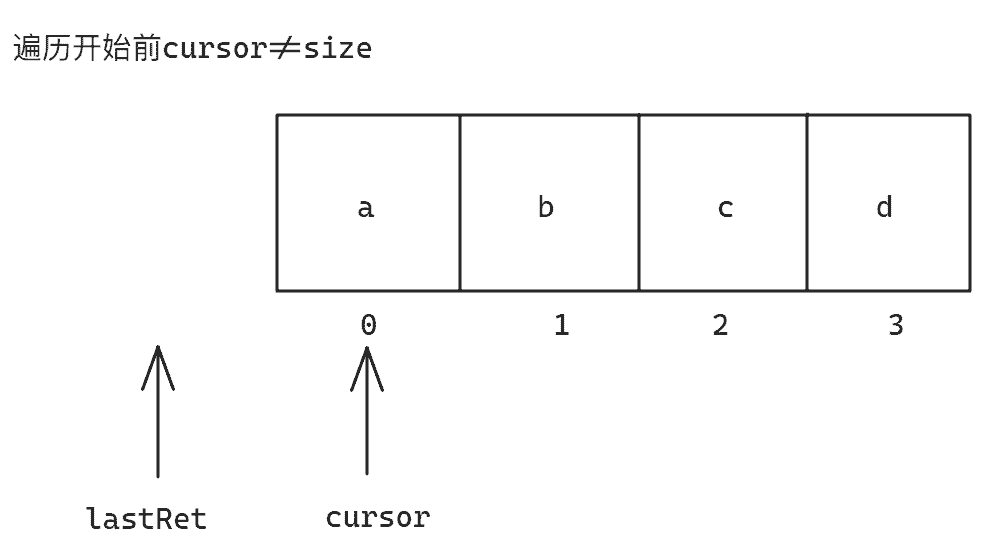
迭代器的执行过程 以前面的代码为例,当前size为4:
当执行hasNext方法时,对应的源码如下:
Java public boolean hasNext () {
return cursor != size ;
}
int cursor ; // 下一个元素的下标
int lastRet = 1 ; // 上一个元素的下标
满足条件进入循环,执行next()方法,对应源码如下:
Java 1
2
3
4
5
6
7
8
9
10
11
12
13
14 public E next () {
// ...
int i = cursor ;
if ( i >= size )
throw new NoSuchElementException ();
Object [] elementData = ArrayList . this . elementData ;
if ( i >= elementData . length )
throw new ConcurrentModificationException ();
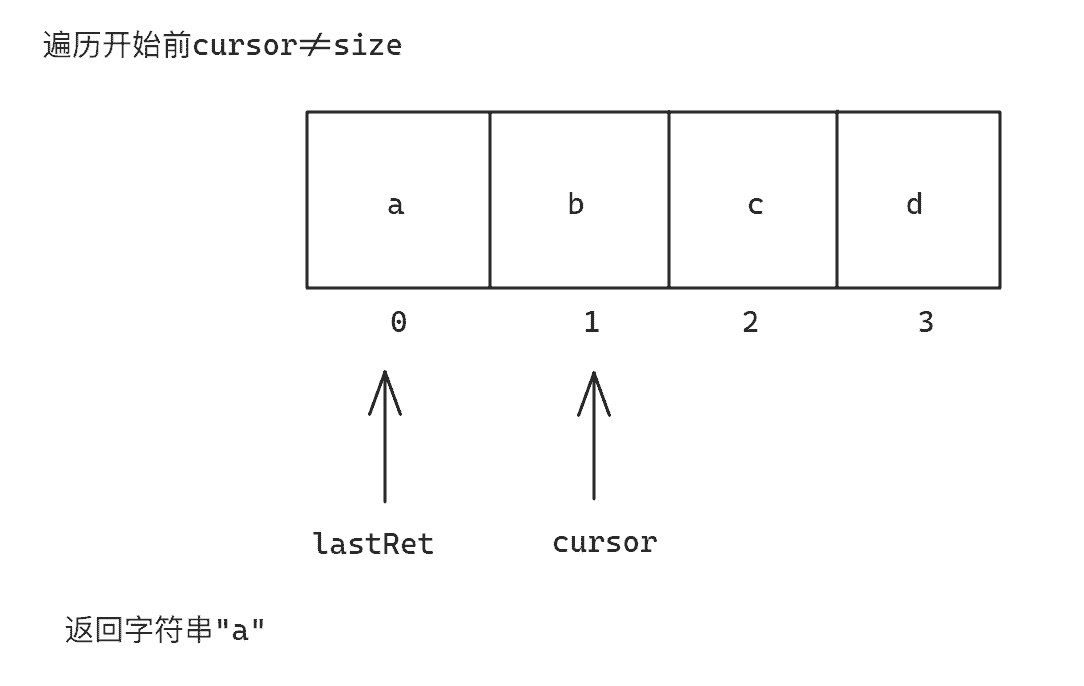
cursor = i + 1 ;
return ( E ) elementData [ lastRet = i ] ;
}
因为cursor既不大于size,也不大于新建数组elementData的长度,所以两个分支语句均不执行
Note
因为ArrayList实现的Iterator是一个Iterator<E>的内部实现类,所以访问ArrayList中的elementData成员相当于内部类访问外部类的成员,而ArrayList中的elementData数组存储的是当前集合中的数据,因为ArrayList底层是数组,所以直接将对应的elementData的地址给新数组引用即可实现数组数据共享
接下来,cursor=i+1使cursor走到下一个元素的位置,因为前面已经判断cursor!=size表示一定存在下一个元素,所以此处不会出现越界问题,接着返回elementData数组中的元素,但是因为新数组引用是Object类型,所以此处需要进行强制类型转换,以确保返回的数据类型与泛型对应的数据类型一致
Note
此处返回的elementData数组元素下标使用到了赋值符号的返回值,赋值符号的返回值为赋值符号左侧变量的值,因为取下标需要先计算内部lastRet=i表达式,所以此处既让lastRet向后移动,又拿到了lastRet向后移动对应位置的值
所以本过程运行结果如下图:
其余情况以此类推,直到cursor!=size返回false,代表已经没有下一个元素,循环结束
迭代器底层原理 在获取迭代器时,调用到了对应集合的成员方法,例如前面ArrayList获取其迭代器对象时使用的代码:
Java Iterator < String > iterator = list . iterator ();
对应的源码如下:
Java 1
2
3
4
5
6
7
8
9
10
11
12
13
14
15
16
17
18
19 public class ArrayList < E > extends AbstractList < E >
implements List < E > , RandomAccess , Cloneable , java . io . Serializable
{
// 返回迭代器对象
public Iterator < E > iterator () {
return new Itr ();
}
// ...
private class Itr implements Iterator < E > {
int cursor ; // index of next element to return
int lastRet = 1 ; // index of last element returned; 1 if no such
int expectedModCount = modCount ;
Itr () {}
// ...
}
// ...
}
实际上获取到的迭代器就是Collection<E>实现类的ArrayList类中内部实现Iterator<E>的对象
需要注意,并不是所有的集合都是new Itr(),例如HashSet的源码
Java 1
2
3
4
5
6
7
8
9
10
11
12
13
14
15
16
17
18
19
20 // HashSet中
public Iterator < E > iterator () {
return map . keySet (). iterator ();
}
// HashMap中
public Set < K > keySet () {
Set < K > ks = keySet ;
if ( ks == null ) {
ks = new KeySet ();
keySet = ks ;
}
return ks ;
}
final class KeySet extends AbstractSet < K > {
// ...
public final Iterator < K > iterator () { return new KeyIterator (); }
// ...
}
在HashSet中,iterator()方法返回的是HashMap中的内部类KeySet中的迭代器
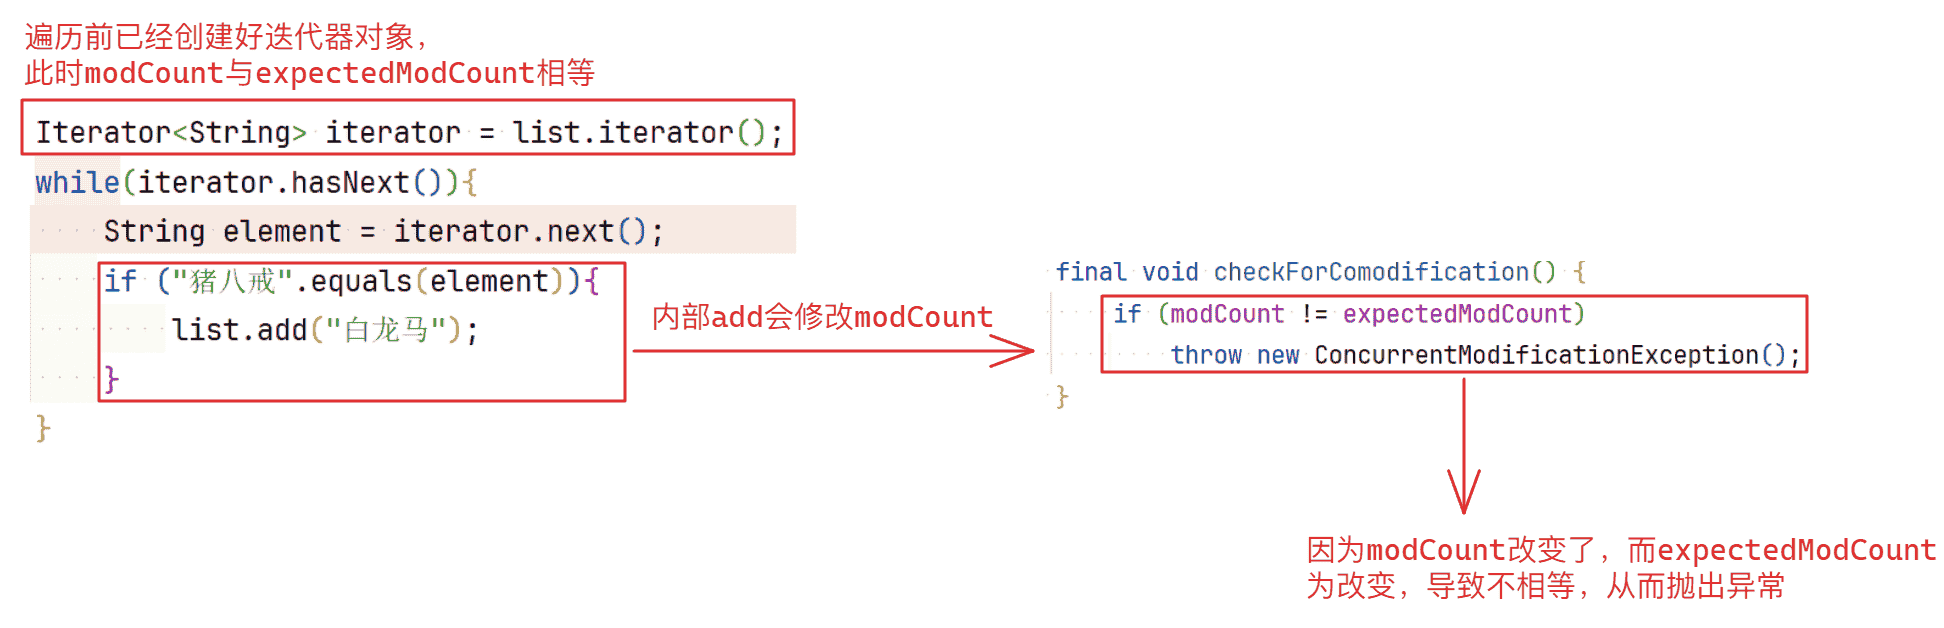
集合中的并发修改异常及原因分析 并发修改异常出现于使用迭代器遍历集合的过程中修改集合中的内容,例如下面的代码:
Java 1
2
3
4
5
6
7
8
9
10
11
12
13
14
15
16
17
18
19
20 public class Test02 {
public static void main ( String [] args ) {
//需求:定义一个集合,存储 唐僧,孙悟空,猪八戒,沙僧,遍历集合,如果遍历到猪八戒,往集合中添加一个白龙马
ArrayList < String > list = new ArrayList <> ();
list . add ( "唐僧" );
list . add ( "孙悟空" );
list . add ( "猪八戒" );
list . add ( "沙僧" );
Iterator < String > iterator = list . iterator ();
while ( iterator . hasNext ()){
String element = iterator . next ();
// 使用迭代器遍历过程中修改集合中的内容
if ( "猪八戒" . equals ( element )){
list . add ( "白龙马" );
}
}
System . out . println ( list );
}
}
报错信息:
Java Exception in thread "main" java . util . ConcurrentModificationException
at java . util . ArrayList$Itr . checkForComodification ( ArrayList . java : 911 )
at java . util . ArrayList$Itr . next ( ArrayList . java : 861 )
at com . epsda . advanced . test_Collection . Test02 . main ( Test02 . java : 24 )
查看源码分析出现这个异常的原因:
Java 1
2
3
4
5
6
7
8
9
10
11
12 public E next () {
checkForComodification ();
// ...
}
// 迭代器内部类
int expectedModCount = modCount ;
final void checkForComodification () {
if ( modCount != expectedModCount )
throw new ConcurrentModificationException ();
}
在执行next()方法时,第一行先调用checkForComodification()方法,该方法用于检测modCount和expectedModCount是否一致,其作用是在多线程环境下检测集合是否被其他线程修改过。而在对应的add函数中,代码如下:
Java 1
2
3
4
5
6
7
8
9
10
11
12
13
14
15
16
17 public boolean add ( E e ) {
ensureCapacityInternal ( size + 1 ); // Increments modCount!!
elementData [ size ++] = e ;
return true ;
}
private void ensureCapacityInternal ( int minCapacity ) {
ensureExplicitCapacity ( calculateCapacity ( elementData , minCapacity ));
}
private void ensureExplicitCapacity ( int minCapacity ) {
modCount ++ ;
// overflowconscious code
if ( minCapacity elementData . length > 0 )
grow ( minCapacity );
}
如果在使用迭代器遍历时修改集合元素就会因为迭代器对象已经创建完毕,而此时的expectedModCount与modCount初始值相等,因为每一次添加数据都会导致modCount改变,导致此时的modCount和expectedCount不对应,从而在checkForComodification()方法中抛出异常,具体流程如下:
总结:不要在使用迭代器遍历集合的同时修改集合中的内容
List接口根据前面的单列集合图可以看出,List接口是Collection接口的子接口,常见的实现类一共有三种:
ArrayList类LinkedList类Vector类(现不常用) ArrayList类介绍 ArrayList类是List接口的实现类,其特点如下:
存储顺序与插入顺序相同 元素可重复 可以使用索引方式操作,实现了RandomAccess接口 线程不安全 底层数据结构是数组(可扩容) 关于RandomAccess接口
RandomAccess是一个无方法的接口,用于标记集合类是否支持高效地通过索引访问元素,开发者可以通过检查集合是否实现RandomAccess接口来决定采用哪种操作方式。例如:
Java if ( list instanceof RandomAccess ) {
// 使用高效的随机访问方式
for ( int i = 0 ; i < list . size (); i ++ ) {
System . out . println ( list . get ( i ));
}
} else {
// 使用迭代器遍历
for ( Object obj : list ) {
System . out . println ( obj );
}
}
构造方法 无参构造ArrayList():构造一个空的ArrayList对象,并且没有初始容量 通过一个初始容量值进行构造ArrayList(int initialCapacity):根据指定的容量值构造一个ArrayList对象,初始容量大小即为指定值 通过一个集合进行构造构造ArrayList(Collection<? extends E> c):根据一个集合中的元素构造一个ArrayList对象(即将指定集合中的元素插入到ArrayList对象中) 基本使用如下:
Java 1
2
3
4
5
6
7
8
9
10
11
12
13
14
15
16
17 public class Test03 {
public static void main ( String [] args ) {
// 无参构造
ArrayList < Integer > list = new ArrayList <> ();
list . add ( 1 );
list . add ( 2 );
list . add ( 3 );
System . out . println ( list ); // [1, 2, 3]
// 通过初始容量构造
ArrayList < Integer > list1 = new ArrayList <> ( 5 );
// 通过已有集合构造
ArrayList < Integer > list2 = new ArrayList <> ( list );
System . out . println ( list2 ); // [1, 2, 3]
}
}
常用方法 boolean add(E e):向集合尾部插入元素,返回值表示插入成功(true)或者失败(false),一般情况下可以不用接收void add(int index, E element):在指定位置添加元素,如果指定位置有元素,则在该元素前插入元素boolean addAll(Collection<? extends E> c):尾插指定集合中的元素到当前集合中boolean remove(Object o):从当前集合中移除指定元素,返回值代表删除成功或者失败E remove(int index):根据索引删除元素,返回被删除的元素E set(int index, E element):修改指定索引的元素,返回被修改的元素E get(int index):根据索引获取元素int size():返回集合中的元素个数void clear():清空集合中的元素boolean contains(Object o):判断指定对象是否存在于集合中int indexOf(Object o):返回对象第一次出现在集合中的位置对应的下标int lastIndexOf(Object o):返回对象最后一次出现在集合中的位置对应的下标List<E> subList(int fromIndex, int toIndex):截取指定部分的元素(左闭右开区间) 上面的方法中,常见的方法不再演示,重点注意remove方法和subList方法,首先对于remove方法来说,如果删除的对象是Integer类型,并且依赖自动装箱,那么此时调用的方法就是根据索引删除的remove方法,例如下面的代码:
Java 1
2
3
4
5
6
7
8
9
10
11
12
13
14
15 public class Test03 {
public static void main ( String [] args ) {
ArrayList < Integer > list = new ArrayList <> ();
list . add ( 1 );
list . add ( 2 );
list . add ( 3 );
list . add ( 4 );
// 需要删除数值为1的元素
// 但是识别的是下标为1的元素
list . remove ( 1 );
System . out . println ( list ); // [1, 3, 4]
}
}
对于这种情况,就需要手动装箱:
Java 1
2
3
4
5
6
7
8
9
10
11
12
13
14 public class Test03 {
public static void main ( String [] args ) {
ArrayList < Integer > list = new ArrayList <> ();
list . add ( 1 );
list . add ( 2 );
list . add ( 3 );
list . add ( 4 );
// 手动装箱
list . remove ( Integer . valueOf ( 1 ));
System . out . println ( list ); // [2, 3, 4]
}
}
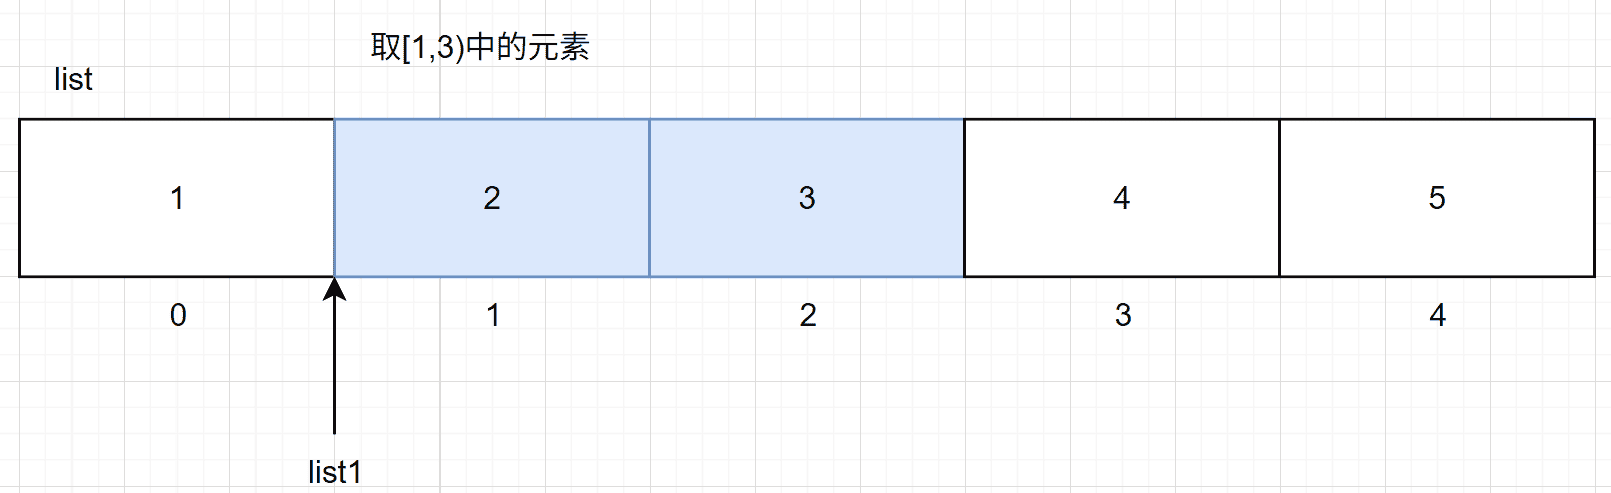
另外,对于subList接口来说,根据接口的定义来看接口会返回一个基于原始集合中指定区间的元素构建一个新的集合返回,也就是说,如果修改新集合中的指定元素不会影响到原有集合中对应的元素,但是事实上,这种操作会影响到原有集合,例如下面的代码:
Java 1
2
3
4
5
6
7
8
9
10
11
12
13
14
15
16
17
18
19
20
21
22 public class Test03 {
public static void main ( String [] args ) {
ArrayList < Integer > list = new ArrayList <> ();
list . add ( 1 );
list . add ( 2 );
list . add ( 3 );
list . add ( 4 );
list . add ( 5 );
List < Integer > list1 = list . subList ( 1 , 3 );
System . out . println ( "修改前:" );
System . out . println ( list ); // [1, 2, 3, 4, 5]
System . out . println ( list1 ); // [2, 3]
list1 . set ( 1 , 6 );
System . out . println ( "修改后" );
System . out . println ( list ); // [1, 2, 6, 4, 5]
System . out . println ( list1 ); // [2, 6]
}
}
之所以会出现这种情况,可以理解为subList并不是真正根据原有元素创建一个新的集合返回,而是以指定区间在原始集合中截取一部分,再使新的集合引用指向该区间的起始元素,本质还是原数组的数据 ,如下图所示:
遍历集合 既可以使用迭代器遍历集合,也可以使用for循环+下标遍历,例如下面的代码:
Java 1
2
3
4
5
6
7
8
9
10
11
12
13
14
15
16
17
18
19
20
21
22
23
24
25
26
27
28
29
30
31
32
33
34 public class Test03 {
public static void main ( String [] args ) {
ArrayList < Integer > list = new ArrayList <> ();
list . add ( 1 );
list . add ( 2 );
list . add ( 3 );
list . add ( 4 );
list . add ( 5 );
// 下标遍历
for ( int i = 0 ; i < list . size (); i ++ ) {
System . out . print ( list . get ( i ) + " " );
}
System . out . println ();
// 迭代器遍历
// 使用Iterator接口
Iterator < Integer > iterator = list . iterator ();
while ( iterator . hasNext ()) {
Integer next = iterator . next ();
System . out . print ( next + " " );
}
System . out . println ();
// 使用ListIterator接口
Iterator < Integer > listIterator = list . listIterator ();
while ( listIterator . hasNext ()) {
Integer next = listIterator . next ();
System . out . print ( next + " " );
}
}
}
对于使用ListIterator来说,除了可以正向遍历,还可以逆向遍历,只需要指定起始位置为集合最后一个元素的下一个位置,再使用hasPrevious()和Previous()接口替换正向的hasNext()和next()即可:
Note
需要注意,Iterator接口中不存在逆向遍历的方法,所以需要使用ListIterator类对象引用接收listIterator()方法的返回值
Java 1
2
3
4
5
6
7
8
9
10
11
12
13
14
15
16
17 public class Test03 {
public static void main ( String [] args ) {
ArrayList < Integer > list = new ArrayList <> ();
list . add ( 1 );
list . add ( 2 );
list . add ( 3 );
list . add ( 4 );
list . add ( 5 );
// 逆向遍历
ListIterator < Integer > listIterator1 = list . listIterator ( list . size ());
while ( listIterator1 . hasPrevious ()) {
Integer previous = listIterator1 . previous ();
System . out . print ( previous + " " );
}
}
}
ArrayList底层源码分析初始容量 实际上ArrayList还有一种构造方法:ArrayList(int initialCapacity),根据给定的数值初始化ArrayList的容量
如果使用空参构造,则默认情况下ArrayList的容量为10,但是需要注意,ArrayList在使用无参构造并且之后不添加任何元素时,其初始容量依旧是0,只有在第一次添加数据时才会开辟容量为10的空间,源码如下:
Java // 默认容量为0的空数组
private static final Object [] DEFAULTCAPACITY_EMPTY_ELEMENTDATA = {};
// ArrayList的数据结构
transient Object [] elementData ;
// 无参构造方法开始时直接使用空数组构造
public ArrayList () {
this . elementData = DEFAULTCAPACITY_EMPTY_ELEMENTDATA ;
}
第一次调用add方法时:
Java 1
2
3
4
5
6
7
8
9
10
11
12
13
14
15
16
17
18
19
20
21
22
23
24
25
26
27
28
29
30
31
32
33
34
35
36
37
38
39
40
41
42
43 // 默认容量
private static final int DEFAULT_CAPACITY = 10 ;
// add方法
public boolean add ( E e ) {
ensureCapacityInternal ( size + 1 ); // Increments modCount!!
elementData [ size ++] = e ;
return true ;
}
// 计算容量
private static int calculateCapacity ( Object [] elementData , int minCapacity ) {
if ( elementData == DEFAULTCAPACITY_EMPTY_ELEMENTDATA ) {
return Math . max ( DEFAULT_CAPACITY , minCapacity );
}
return minCapacity ;
}
// 确保内部数组容量方法
private void ensureCapacityInternal ( int minCapacity ) {
ensureExplicitCapacity ( calculateCapacity ( elementData , minCapacity ));
}
// 修改内部数组大小
private void ensureExplicitCapacity ( int minCapacity ) {
modCount ++ ;
// overflowconscious code
if ( minCapacity elementData . length > 0 )
grow ( minCapacity );
}
private void grow ( int minCapacity ) {
// overflowconscious code
int oldCapacity = elementData . length ;
int newCapacity = oldCapacity + ( oldCapacity >> 1 );
if ( newCapacity minCapacity < 0 )
newCapacity = minCapacity ;
if ( newCapacity MAX_ARRAY_SIZE > 0 )
newCapacity = hugeCapacity ( minCapacity );
// minCapacity is usually close to size, so this is a win:
elementData = Arrays . copyOf ( elementData , newCapacity );
}
因为此时底层数组的容量大小为0,所以在calculateCapacity方法中进入分支语句,此时判断默认容量大小成员DEFAULT_CAPACITY和minCapacity哪一个大,而minCapacity在add方法中是size成员加1的结果,此时因为数组长度为0,所以size也为0,所以minCapacity此时就是1,很明显DEFAULT_CAPACITY和minCapacity,DEFAULT_CAPACITY会更大,所以calculateCapacity方法返回DEFAULT_CAPACITY给ensureExplicitCapacity方法,在该方法中的分支语句判断时,因为minCapacity为1,elementData.length为0,所以此时需要扩容,进入grow方法,传递minCapacity,在grow方法中,oldCapacity为0,newCapacity此时也为0,所以newCapacityminCapacity(此时是DEFAULT_CAPACITY)满足小于0的条件,newCapacity就被更新为DEFAULT_CAPACITY的值,开辟空间后拷贝原数组的数据即可
综上所述:使用ArrayList的无参构造时,默认情况下不会开辟一个容量为10的数组,只有在第一次添加数据时,该数组容量才会变为10
数组扩容 Java 1
2
3
4
5
6
7
8
9
10
11
12
13
14
15
16
17
18
19
20
21
22
23
24
25 private void grow ( int minCapacity ) {
// overflowconscious code
int oldCapacity = elementData . length ;
int newCapacity = oldCapacity + ( oldCapacity >> 1 );
if ( newCapacity minCapacity < 0 )
newCapacity = minCapacity ;
if ( newCapacity MAX_ARRAY_SIZE > 0 )
newCapacity = hugeCapacity ( minCapacity );
// minCapacity is usually close to size, so this is a win:
elementData = Arrays . copyOf ( elementData , newCapacity );
}
public static < T > T [] copyOf ( T [] original , int newLength ) {
return ( T [] ) copyOf ( original , newLength , original . getClass ());
}
public static < T , U > T [] copyOf ( U [] original , int newLength , Class <? extends T []> newType ) {
@SuppressWarnings ( "unchecked" )
T [] copy = (( Object ) newType == ( Object ) Object [] . class )
? ( T [] ) new Object [ newLength ]
: ( T [] ) Array . newInstance ( newType . getComponentType (), newLength );
System . arraycopy ( original , 0 , copy , 0 ,
Math . min ( original . length , newLength ));
return copy ;
}
从这个源码可以看出,当newCapacity大于minCapacity时,两个分支if都不会执行,并且扩容大小为原数组大小的1.5倍,传递s和当前数组,调用copyOf方法,进入该方法后底层调用系统数组拷贝方法arraycopy,在拷贝时,使用了min方法控制是否要改变数组长度,将原数组的数据拷贝到新数组中,再改变成员elementData的指向,但是不论是否原数组长度小于新长度还是其他情况,都会对原数据进行拷贝
Note
需要注意,尽管在某些情况下不需要扩容,但为了简化代码逻辑和保证数据一致性,通常会统一处理,即总是创建一个新数组并拷贝原有内容。这样做虽然在某些场景下可能有些许性能开销,但在整体上更加安全可靠
LinkedList类介绍 LinkedList类是List接口的实现类,其特点如下:
存储顺序与插入顺序相同 元素可重复 可以使用索引方式操作,但是该类没有实现RandomAccess接口 线程不安全 底层数据结构是不带头双向不循环链表 构造方法 无参构造LinkedList():构造一个空的LinkedList对象,并且没有初始容量 通过一个集合进行构造构造LinkedList(Collection<? extends E> c):根据一个集合中的元素构造一个LinkedList对象(即将指定集合中的元素插入到LinkedList对象中) 常用方法 public void addFirst(E e):将指定元素插入此列表的开头public void addLast(E e):将指定元素添加到此列表的结尾public boolean add(E e):将指定元素添加到此列表的结尾,效果等同于addLastpublic E getFirst():返回此列表的第一个元素public E getLast():返回此列表的最后一个元素public E get(int index):获取索引位置的元素public E removeFirst():移除并返回此列表的第一个元素,返回被删除的元素public E removeLast():移除并返回此列表的最后一个元素,返回被删除的元素public boolean isEmpty():如果列表没有元素,则返回true,否则返回falseint size():返回集合中的元素个数void clear():清空集合中的元素boolean contains(Object o):判断指定对象是否存在于集合中int indexOf(Object o):返回对象第一次出现在集合中的位置对应的下标int lastIndexOf(Object o):返回对象最后一次出现在集合中的位置对应的下标List<E> subList(int fromIndex, int toIndex):截取指定部分的元素(左闭右开区间) 基本使用如下:
Java 1
2
3
4
5
6
7
8
9
10
11
12
13
14
15
16
17
18
19
20
21
22
23
24
25
26 public class Test05 {
public static void main ( String [] args ) {
LinkedList < String > linkedList = new LinkedList <> ();
linkedList . add ( "吕布" );
linkedList . add ( "刘备" );
linkedList . add ( "关羽" );
linkedList . add ( "张飞" );
linkedList . add ( "貂蝉" );
System . out . println ( linkedList );
linkedList . addFirst ( "孙尚香" );
System . out . println ( linkedList );
linkedList . addLast ( "董卓" );
System . out . println ( linkedList );
System . out . println ( linkedList . getFirst ());
System . out . println ( linkedList . getLast ());
linkedList . removeFirst ();
System . out . println ( linkedList );
linkedList . removeLast ();
System . out . println ( linkedList );
}
}
需要注意两个比较特殊的方法:
public E pop():删除链表头数据,返回被删除的元素public void push(E e):在链表头插入数据 Java 1
2
3
4
5
6
7
8
9
10
11
12
13
14
15 public class Test06 {
public static void main ( String [] args ) {
LinkedList < String > linkedList = new LinkedList <> ();
linkedList . add ( "吕布" );
linkedList . add ( "刘备" );
linkedList . add ( "关羽" );
linkedList . add ( "张飞" );
linkedList . add ( "貂蝉" );
linkedList . pop ();
System . out . println ( linkedList );
linkedList . push ( "孙尚香" );
System . out . println ( linkedList );
}
}
对于remove和subList来说,同样需要注意与ArrayList类似的问题
遍历集合 与ArrayList一样,可以使用迭代器,也可以使用for循环+下标
Note
需要注意,默认情况下LinkedList不支持下标访问,因为链表没有下标的概念,但是因为LinkedList提供了类似于下标访问的方法,所以可以使用下标
Java 1
2
3
4
5
6
7
8
9
10
11
12
13
14
15
16
17
18
19
20
21
22
23
24
25
26
27
28
29 public class Test06 {
public static void main ( String [] args ) {
LinkedList < String > linkedList = new LinkedList <> ();
linkedList . add ( "吕布" );
linkedList . add ( "刘备" );
linkedList . add ( "关羽" );
linkedList . add ( "张飞" );
linkedList . add ( "貂蝉" );
// 迭代器遍历
Iterator < String > iterator = linkedList . iterator ();
while ( iterator . hasNext ()) {
String next = iterator . next ();
System . out . println ( next );
}
// for循环+下标
for ( int i = 0 ; i < linkedList . size (); i ++ ) {
System . out . println ( linkedList . get ( i ));
}
// 使用ListIterator进行逆向遍历
ListIterator < String > integerListIterator = linkedList . listIterator ( linkedList . size ());
while ( integerListIterator . hasPrevious ()) {
Integer previous = integerListIterator . previous ();
System . out . println ( previous );
}
}
}
LinkedList底层源码分析LinkedList成员分析对于LinkedList来说:
Java 1
2
3
4
5
6
7
8
9
10
11
12
13
14
15
16
17
18
19
20
21
22 public class LinkedList < E >
extends AbstractSequentialList < E >
implements List < E > , Deque < E > , Cloneable , java . io . Serializable
{
transient int size = 0 ;
/**
* Pointer to first node.
* Invariant: (first == null && last == null) ||
* (first.prev == null && first.item != null)
*/
transient Node < E > first ;
/**
* Pointer to last node.
* Invariant: (first == null && last == null) ||
* (last.next == null && last.item != null)
*/
transient Node < E > last ;
// ...
}
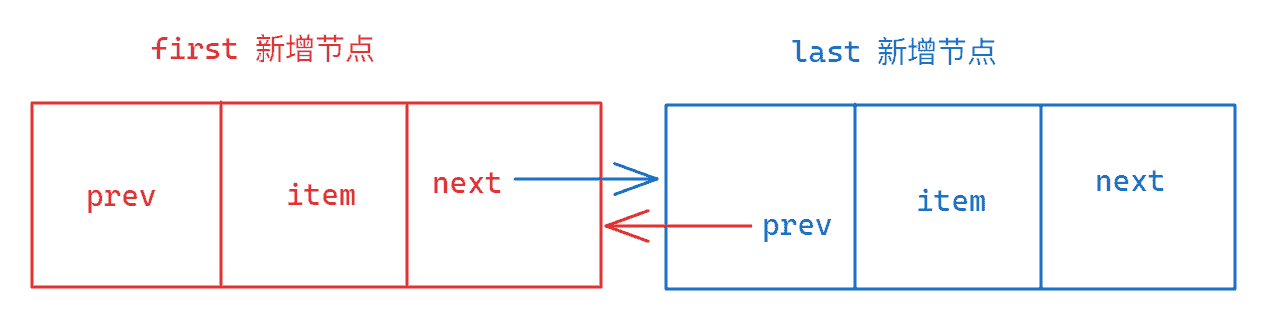
对于其中的Node<E>类型(LinkedList的内部类)来说:
Java private static class Node < E > {
E item ;
Node < E > next ;
Node < E > prev ;
Node ( Node < E > prev , E element , Node < E > next ) {
this . item = element ;
this . next = next ;
this . prev = prev ;
}
}
下图是一种情况,对于每一个成员的作用进行解释:
LinkedList中add方法源码分析Java 1
2
3
4
5
6
7
8
9
10
11
12
13
14
15
16 public boolean add ( E e ) {
linkLast ( e );
return true ;
}
void linkLast ( E e ) {
final Node < E > l = last ;
final Node < E > newNode = new Node <> ( l , e , null );
last = newNode ;
if ( l == null )
first = newNode ;
else
l . next = newNode ;
size ++ ;
modCount ++ ;
}
调用add方法,相当于调用linkLast方法,当last节点为空节点时,说明当前不存在任何一个节点,此时将头结点指向新插入的节点,否则让最后一个节点的next引用新插入的节点
LinkedList中get方法源码分析Java 1
2
3
4
5
6
7
8
9
10
11
12
13
14
15
16
17
18
19
20
21 public E get ( int index ) {
checkElementIndex ( index );
return node ( index ). item ;
}
Node < E > node ( int index ) {
// assert isElementIndex(index);
if ( index < ( size >> 1 )) {
Node < E > x = first ;
for ( int i = 0 ; i < index ; i ++ )
x = x . next ;
return x ;
} else {
Node < E > x = last ;
for ( int i = size - 1 ; i > index ; i -- )
x = x . prev ;
return x ;
}
}
对于LinkedList中的get方法,采用了一种二分的思想,但不完全是二分查找算法的思想,其基本思想是将链表的长度切一半,如果查找的下标小于链表大小的一半,说明需要在前一半中顺序遍历查找,否则在后一半中顺序遍历查找
Stack类介绍 Stack类是Vector类的子类,通过Vector来实现对应的栈结构
构造方法 栈结构只有一个无参构造,此处不演示
常用方法 E push(E e):将指定元素入栈E pop():弹出栈顶元素并返回该元素E peek():获取栈顶元素,但是不弹出栈顶元素int size():获取栈中有效元素个数boolean empty():判断栈是否为空 Note
需要注意的是,因为Stack类是Vector的子类,所以Vector类中的部分方法Stack类也同样拥有,例如通过索引获取元素,但是并不推荐这样使用,因为这就打破了栈结构的意义
基本使用如下:
Java 1
2
3
4
5
6
7
8
9
10
11
12
13 public class Test08 {
public static void main ( String [] args ) {
Stack < Integer > stack = new Stack <> ();
stack . push ( 1 );
stack . push ( 2 );
stack . push ( 3 );
stack . push ( 4 );
System . out . println ( stack . pop ());
System . out . println ( stack . size ());
System . out . println ( stack . empty ());
}
}
遍历集合 对于Stack来说,并没有提供专门的迭代器用于遍历,只能通过栈结构本身的特性进行遍历:
Java 1
2
3
4
5
6
7
8
9
10
11
12
13
14 public class Test08 {
public static void main ( String [] args ) {
Stack < Integer > stack = new Stack <> ();
stack . push ( 1 );
stack . push ( 2 );
stack . push ( 3 );
stack . push ( 4 );
while ( ! stack . empty ()) {
Integer i = stack . pop ();
System . out . println ( i );
}
}
}
需要注意的是,因为Stack类是继承自Vector类,而Vector类是实现了迭代器接口的,所以Stack类也可以通过Vector类的iterator()方法获取到迭代器进行遍历,但是此时遍历的顺序已经违背了栈结构的特点,所以不推荐使用
Queue接口Queue接口下有一个接口Deque,Deque表示双端队列,该结构的特点就是两端都可以进元素和出元素,在Deque接口下有一个实现类LinkedList类,也就是说,在Java中实现队列和双端队列都是通过LinkedList类来间接实现的。除此之外,在Queue接口下还有一个直接的实现类PriorityQueue,表示优先级队列(堆)
基于LinkedList类实现队列 常用方法 boolean offer(E e):向队尾插入数据E poll():从队头弹出数据,并返回队头数据E peek():获取队头元素,但是不弹出数据int size():获取队列元素个数 基本使用如下:
Java public class Test08 {
public static void main ( String [] args ) {
Queue < Integer > queue = new LinkedList <> ();
queue . offer ( 1 );
queue . offer ( 2 );
queue . offer ( 3 );
System . out . println ( queue . poll ());
System . out . println ( queue . size ());
}
}
需要注意的是,Queue接口并没有提供判断队列是否为空的抽象方法,但是因为Queue实现了Collection接口,Deque实现了Queue接口,而LinkedList类实现了Deque接口,在Collection接口中有一个isEmpty()的抽象方法,根据接口的特点,实现类必须要重写所有的抽象方法,所以判断队列是否为空就可以通过LinkedList实现的isEmpty()达到对应的效果:
Java public class Test08 {
public static void main ( String [] args ) {
Queue < Integer > queue = new LinkedList <> ();
queue . offer ( 1 );
queue . offer ( 2 );
queue . offer ( 3 );
System . out . println ( queue . isEmpty ());
}
}
遍历集合 通过队列的特点进行遍历:
Java 1
2
3
4
5
6
7
8
9
10
11
12
13 public class Test08 {
public static void main ( String [] args ) {
Queue < Integer > queue = new LinkedList <> ();
queue . offer ( 1 );
queue . offer ( 2 );
queue . offer ( 3 );
while ( ! queue . isEmpty ()) {
Integer i = queue . poll ();
System . out . println ( i );
}
}
}
基于LinkedList和ArrayDeque实现双端队列 双端队列的方法此处不具体展示,详情可见官方文档,但是双端队列有两种实现类,一种是基于数组的线性实现类ArrayDeque,另外一种就是基于链表的链式实现类LinkedList,如下:
Java Deque < Integer > deque1 = new ArrayDeque <> (); // 双端队列的线性实现
Deque < Integer > deque2 = new LinkedList <> (); // 双端队列的链式实现
PriorityQueue类介绍 PriorityQueue类底层实现使用的是堆结构。在Java中,PriorityQueue有以下几个特点:
不可以存储null值 存储的元素必须是可比较的 ,即要么实现了Comparable接口,要么提供了实现Comparator接口的比较器对象默认情况下,PriorityQueue是小堆 ,即每次获取到的元素都是最小的元素 线程不安全,但是存在一个线程安全的版本PriorityBlockingQueue 构造方法 PriorityQueue类提供了以下几个构造方法:
无参构造PriorityQueue():创建一个初始容量为11的小堆 初始容量值构造PriorityQueue(int initialCapacity):创建一个指定初始容量的小堆 通过集合构造PriorityQueue(Collection<? extends E> c):根据指定集合创建一个小堆,集合中的元素必须是可比较的,否则会抛出ClassCastException异常 根据具体的比较器构造PriorityQueue(Comparator<? super E> comparator):根据指定比较器创建一个堆 初始容量和比较器构造PriorityQueue(int initialCapacity, Comparator<? super E> comparator):根据指定初始容量和比较器创建一个堆 常用方法 boolean offer(E e):向堆内插入元素,容量不足情况下会进行扩容E poll():弹出堆内元素,并返回弹出的元素E peek():获取堆顶数据int size():获取堆元素个数void clear():清空堆 基本使用如下:
Java 1
2
3
4
5
6
7
8
9
10
11
12
13
14
15
16
17
18
19 public class Test09 {
public static void main ( String [] args ) {
// 默认小堆
PriorityQueue < Integer > priorityQueue = new PriorityQueue <> ();
priorityQueue . offer ( 1 );
priorityQueue . offer ( 56 );
priorityQueue . offer ( 3 );
priorityQueue . offer ( 42 );
priorityQueue . offer ( 1 );
priorityQueue . offer ( 56 );
priorityQueue . offer ( 3 );
priorityQueue . offer ( 42 );
System . out . println ( priorityQueue . size ()); // 8
System . out . println ( priorityQueue . peek ()); // 1
System . out . println ( priorityQueue . poll ()); // 1
}
}
遍历集合 默认情况下,PriorityQueue提供了对应的iterator()用于获取迭代器,但是这个方法并不会按照升序或者降序进行遍历,而是直接输出数组中的元素。所以如果想利用堆结构的特点进行遍历需要使用循环的方式:
Java 1
2
3
4
5
6
7
8
9
10
11
12
13
14
15
16
17
18
19
20 public class Test09 {
public static void main ( String [] args ) {
// 默认小堆
PriorityQueue < Integer > priorityQueue = new PriorityQueue <> ();
priorityQueue . offer ( 1 );
priorityQueue . offer ( 56 );
priorityQueue . offer ( 3 );
priorityQueue . offer ( 42 );
priorityQueue . offer ( 1 );
priorityQueue . offer ( 56 );
priorityQueue . offer ( 3 );
priorityQueue . offer ( 42 );
while ( ! priorityQueue . isEmpty ()) {
Integer i = priorityQueue . poll ();
System . out . print ( i + " " ); // 1 1 3 3 42 42 56 56
}
}
}
指定比较器 要知道如何实现一个大堆就需要指定底层PriorityQueue是如何进行元素大小比较的,因为在调用offer时会进行向上调整,所以可以进入到offer方法内部:
Java public boolean offer ( E e ) {
if ( e == null )
throw new NullPointerException ();
modCount ++ ;
int i = size ;
if ( i >= queue . length )
grow ( i + 1 );
siftUp ( i , e );
size = i + 1 ;
return true ;
}
在该方法中,siftup方法就是用于进行向上调整的方法,该方法实现如下:
Java private void siftUp ( int k , E x ) {
if ( comparator != null )
siftUpUsingComparator ( k , x , queue , comparator );
else
siftUpComparable ( k , x , queue );
}
在该方法中,存在着两种调整方式,而区别就在于是否传递了比较器,二者对应的实现如下:
在这两个方法中,调整过程分别调用了compare和compareTo方法,并且判断逻辑都是是否大于等于0,也就是说,比较方式的结果是大于等于0的就进行调整 。基于这个逻辑,设计大堆时可以参考如下:
Java 1
2
3
4
5
6
7
8
9
10
11
12
13
14
15
16
17
18
19
20
21 public class Test09 {
public static void main ( String [] args ) {
// 通过比较器指定为大堆
PriorityQueue < Integer > integers = new PriorityQueue <> ( new Comparator < Integer > () {
@Override
public int compare ( Integer o1 , Integer o2 ) {
return o2 - o1 ;
}
});
integers . offer ( 1 );
integers . offer ( 56 );
integers . offer ( 3 );
integers . offer ( 42 );
while ( ! integers . isEmpty ()) {
Integer i = integers . poll ();
System . out . print ( i + " " ); // 56 42 3 1
}
}
}
PriorityQueue类的扩容方式在JDK1.8中,扩容源码如下:
Java 1
2
3
4
5
6
7
8
9
10
11
12
13
14
15
16
17 private static final int MAX_ARRAY_SIZE = Integer . MAX_VALUE - 8 ;
private void grow ( int minCapacity ) {
int oldCapacity = queue . length ;
// Double size if small; else grow by 50%
int newCapacity = oldCapacity + (( oldCapacity < 64 ) ? ( oldCapacity + 2 ) : ( oldCapacity >> 1 ));
// overflow-conscious code
if ( newCapacity - MAX_ARRAY_SIZE > 0 )
newCapacity = hugeCapacity ( minCapacity );
queue = Arrays . copyOf ( queue , newCapacity );
}
private static int hugeCapacity ( int minCapacity ) {
if ( minCapacity < 0 ) // overflow
throw new OutOfMemoryError ();
return ( minCapacity > MAX_ARRAY_SIZE ) ? Integer . MAX_VALUE : MAX_ARRAY_SIZE ;
}
扩容方式说明:
如果容量小于64时,是按照oldCapacity的2倍方式扩容的,如果容量大于等于64,是按照oldCapacity的1.5倍方式扩容的。如果容量超过MAX_ARRAY_SIZE,按照MAX_ARRAY_SIZE来进行扩容
Set接口Set接口实际上并没有对Collection接口进行功能上的扩充,而且所有的Set集合底层都是依靠Map实现,部分内容将在Map中具体介绍
Set和Map密切相关的
Map的遍历需要先变成单列集合,只能变成Set集合
TreeSet类介绍 TreeSet类是Set接口的实现类,其有如下的特点:
默认会对插入的数据进行排序,所以存储的类型必须实现Comparable接口,或者提供实现了Comparator的比较器 没有索引的方式操作元素 不可以存null值 相同元素不重复出现 线程不安全 底层数据结构为红黑树
构造方法 无参构造方法:TreeSet(),默认按照ASCII码对元素进行比较 使用传递比较器作为参数的有参构造方法:TreeSet(Comparator<? super E> comparator) 使用传递集合作为参数的有参构造方法:TreeSet(Collection<? extends E> c) 常用方法 boolean add(E e):添加元素,若元素存在则返回falseboolean addAll(Collection<? extends E> c):添加集合中的所有元素boolean remove(Object o):移除元素,若元素不存在则返回falsevoid clear():清空集合boolean contains(Object o):判断集合是否包含元素boolean isEmpty():判断集合是否为空int size():返回集合中的元素个数Iterator<E> iterator():返回迭代器 基本使用如下:
Java 1
2
3
4
5
6
7
8
9
10
11
12
13
14
15
16 public class Test02 {
public static void main ( String [] args ) {
TreeSet < Integer > set = new TreeSet <> ();
set . add ( 1 );
set . add ( 2 );
set . add ( 3 );
set . add ( 4 );
set . add ( 5 );
set . remove ( 1 );
System . out . println ( set );
System . out . println ( set . size ());
System . out . println ( set . isEmpty ());
}
}
存储自定义类型:
HashSet类HashSet是Set接口的实现类,下面是HashSet的特点:
元素不允许重复 元素插入顺序与存储顺序不一定相同 没有索引的方式操作元素 线程不安全 底层数据结构: JDK8之前:哈希表(数组+链表实现) JDK8之后:哈希表(数组+链表+红黑树实现) 方法:与Collection接口中的方法基本一致,但是因为HashSet是实现类,所以HashSet存在具体的方法体 遍历方式: 增强for 迭代器 构造方法 无参构造方法:HashSet(),默认调用父类Object类的hashCode()方法,如果重写了hashCode()则调用自定义的hashCode() 使用传递集合作为参数的有参构造方法:HashSet(Collection<? extends E> c) 常用方法 boolean add(E e):添加元素,若元素存在则返回falseboolean remove(Object o):移除元素,若元素不存在则返回falsevoid clear():清空集合boolean contains(Object o):判断集合是否包含元素boolean isEmpty():判断集合是否为空int size():返回集合中的元素个数Iterator<E> iterator():返回迭代器 基本使用实例:
Java 1
2
3
4
5
6
7
8
9
10
11
12
13
14
15
16
17 public class Test {
public static void main ( String [] args ) {
HashSet < Integer > set = new HashSet <> ();
set . add ( 1 );
set . add ( 2 );
set . add ( 3 );
set . add ( 4 );
set . add ( 5 );
set . remove ( 1 );
System . out . println ( set );
System . out . println ( set . size ());
System . out . println ( set . isEmpty ());
}
}
LinkedHashSet类LinkedHashSet是HashSet的子类,下面是LinkedHashSet的特点:
元素唯一 元素插入顺序与存储顺序相同 没有索引的方式操作元素 线程不安全 底层数据结构:哈希表+双向链表 方法:与HashSet基本一致 基本使用如下:
Java 1
2
3
4
5
6
7
8
9
10
11
12
13
14
15
16
17
18 public class Test01 {
public static void main ( String [] args ) {
LinkedHashSet < String > set = new LinkedHashSet <> ();
set . add ( "张三" );
set . add ( "李四" );
set . add ( "王五" );
set . add ( "赵六" );
set . add ( "田七" );
set . add ( "张三" );
System . out . println ( set );
//迭代器
Iterator < String > iterator = set . iterator ();
while ( iterator . hasNext ()){
System . out . println ( iterator . next ());
}
}
}
SortSet类SortedSet是Java集合框架中Set接口的子接口,它维护有序 的元素集合(按元素的自然顺序或指定的比较器排序)。下面是SortedSet的特点:
有序性 :元素始终按升序(或自定义顺序)排列唯一性 :继承 Set,不允许重复元素范围视图 :可获取集合的局部视图(子集)端点访问 :可直接获取最小/最大元素 SortedSet类的主要实现类是TreeSet
除了继承 Set 的方法外,新增:
first() / last():获取首/尾元素headSet(toElement):返回小于指定元素的子集tailSet(fromElement):返回大于等于指定元素的子集subSet(from, to):返回区间子集comparator():获取排序器(自然排序返回null) 基本使用如下:
Java 1
2
3
4
5
6
7
8
9
10
11
12
13
14
15
16
17
18
19
20
21
22
23 import java.util.SortedSet ;
import java.util.TreeSet ;
// 自然排序(数字升序)
SortedSet < Integer > numbers = new TreeSet <> ();
numbers . add ( 5 );
numbers . add ( 1 );
numbers . add ( 9 );
System . out . println ( numbers ); // [1, 5, 9]
// 获取首尾
System . out . println ( numbers . first ()); // 1
System . out . println ( numbers . last ()); // 9
// 范围查询(5到9之间,不含9)
System . out . println ( numbers . subSet ( 5 , 9 )); // [5]
// 自定义排序(字符串长度倒序)
SortedSet < String > words = new TreeSet <> (( a , b ) -> b . length () - a . length ());
words . add ( "apple" );
words . add ( "banana" );
words . add ( "pie" );
System . out . println ( words ); // [banana, apple, pie]
哈希值介绍 在Java中,哈希值是由计算机算出来的一个十进制数,可以看做是对象的地址值
需要获取对象的哈希值可以通过Object类中的本地方法:public native int hashCode()
例如查看Person类的两个对象的hashCode
Java 1
2
3
4
5
6
7
8
9
10
11
12
13 public class Test {
public static void main ( String [] args ) {
Person person1 = new Person ();
Person person2 = new Person ();
System . out . println ( person1 . hashCode ());
System . out . println ( person2 . hashCode ());
}
}
输出结果 :
1163157884
1956725890
实际上,在Person类中没有重写toString方法时打印的数据后面数字对应的就是对象的hashCode,只是显示的是对应的16进制,例如下面的代码
Java 1
2
3
4
5
6
7
8
9
10
11
12
13 public class Test {
public static void main ( String [] args ) {
Person person1 = new Person ();
Person person2 = new Person ();
System . out . println ( person1 );
System . out . println ( person2 );
}
}
输出结果 :
com . epsda . advanced . test_HashCode . Person @ 4554617 c
com . epsda . advanced . test_HashCode . Person @ 74 a14482
如果将前面直接打印的hashCode值以16进制形式打印,则此时会发现对应的数值与默认打印对象名的数据的hashCode一致,例如下面的代码:
Java 1
2
3
4
5
6
7
8
9
10
11
12
13
14
15
16
17
18 public class Test {
public static void main ( String [] args ) {
Person person1 = new Person ();
Person person2 = new Person ();
System . out . println ( Integer . toHexString ( person1 . hashCode ()));
System . out . println ( Integer . toHexString ( person2 . hashCode ()));
System . out . println ( person1 );
System . out . println ( person2 );
}
}
输出结果 :
4554617 c
74 a14482
com . epsda . advanced . test_HashCode . Person @ 4554617 c
com . epsda . advanced . test_HashCode . Person @ 74 a14482
所以,当对象重写了toString方法,此时就不会打印对象的地址,实际上就是不打印对应的hashCode
如果在类中重写hashcode,此时打印对象的hashCode值就会根据内容进行计算,例如下面的代码:
Java 1
2
3
4
5
6
7
8
9
10
11
12
13
14
15
16
17
18
19
20
21
22
23
24
25 // Person类
public class Person {
// ...
// 重写hashCode
@Override
public int hashCode () {
return Objects . hash ( name , age );
}
}
public class Test {
public static void main ( String [] args ) {
Person person1 = new Person ( "张三" , 23 );
Person person2 = new Person ( "张三" , 23 );
System . out . println ( person1 . hashCode ());
System . out . println ( person2 . hashCode ());
}
}
输出结果 :
24022543
24022543
在上面的代码中,因为Person类的两个对象内容一致,并且因为Person类重写了hashCode方法,方法中是根据成员内容进行hashCode计算的,所以打印的hashcode是相同的
但是,有些特殊情况,内容不同时,hashCode可能相同,这个现象被称为哈希冲突(或哈希碰撞) ,例如下面的代码:
Java 1
2
3
4
5
6
7
8
9
10
11
12
13 public class Test {
public static void main ( String [] args ) {
String s1 = "通话" ;
String s2 = "重地" ;
System . out . println ( s1 . hashCode ());
System . out . println ( s2 . hashCode ());
}
}
输出结果 :
1179395
1179395
总结:
当内容相同时,hashCode一定相同;但是内容不同时,hashCode不一定相同
Java中计算哈希值的方法 以下面的代码为例:
Java public class Test01 {
public static void main ( String [] args ) {
String s = "abc" ;
System . out . println ( s . hashCode ());
}
}
对应的hashCode源码如下:
Java 1
2
3
4
5
6
7
8
9
10
11
12 public int hashCode () {
int h = hash ;
if ( h == 0 && value . length > 0 ) {
char val [] = value ;
for ( int i = 0 ; i < value . length ; i ++ ) {
h = 31 * h + val [ i ] ;
}
hash = h ;
}
return h ;
}
上面的代码中,value是String底层的byte类型数组,使用char类型的val数组接受,根据val数组中的字符依次进行h = h * 31 + val[i]进行计算直到循环结束,此时h即为对应的hash值
Note
计算hashCode时,之所以使用31可以简单理解为31是一个质数,31这个数通过大量的计算和统计,认为用31,可以尽量降低内容不一样但是哈希值一样的情况
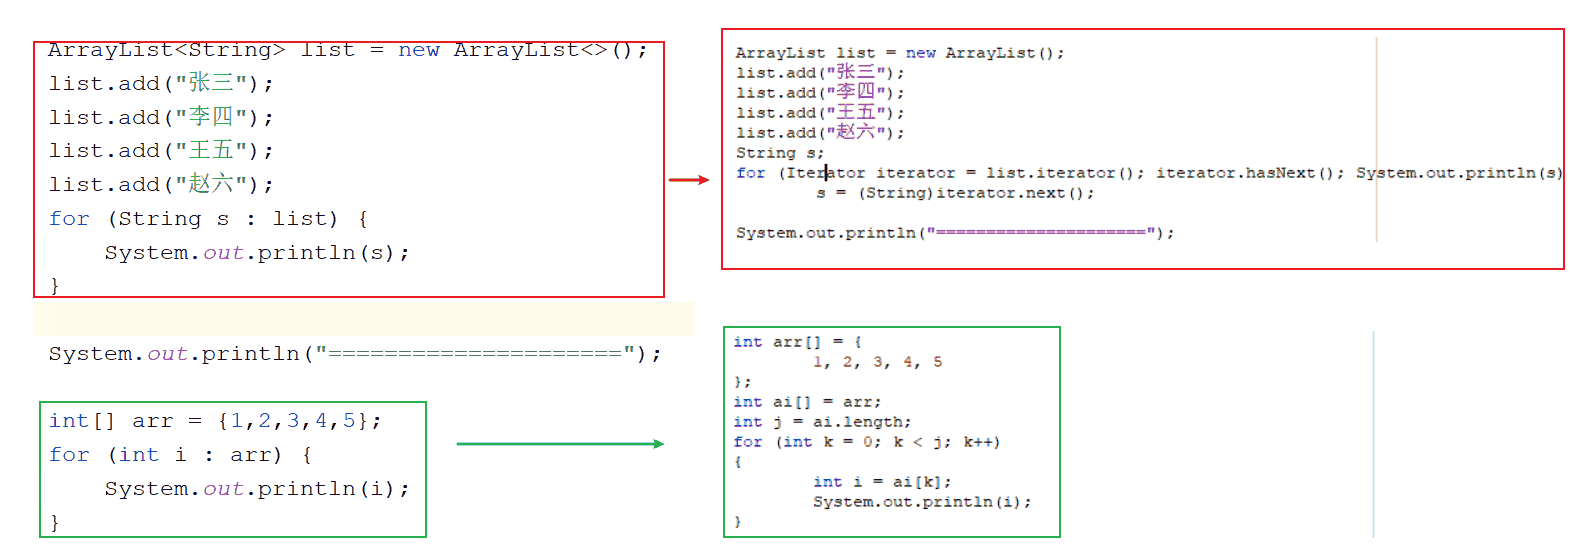
增强for循环 增强for循环对于集合来说,本质是使用到了迭代器,而对于数组来说,本质是数组的下标遍历
使用格式如下:
Java for ( 集合 / 数组元素的类型 存储元素的变量名 : 集合 / 数组名 ) {
// 遍历操作
}
基本使用如下:
Java 1
2
3
4
5
6
7
8
9
10
11
12
13
14
15
16
17
18
19 public class Test07 {
public static void main ( String [] args ) {
ArrayList < String > list = new ArrayList <> ();
list . add ( "张三" );
list . add ( "李四" );
list . add ( "王五" );
list . add ( "赵六" );
for ( String s : list ) {
System . out . println ( s );
}
System . out . println ( "=====================" );
int [] arr = { 1 , 2 , 3 , 4 , 5 };
for ( int i : arr ) {
System . out . println ( i );
}
}
}
反编译查看底层:
Collections集合工具类不同于Collection,Collections是一个工具类,所以其构造方法为私有方法,成员方法为静态
常用方法:
static <T> boolean addAll(Collection<? super T> c, T... elements):批量向指定集合添加数据,第二个参数为一个可变参数列表,表示可以一次性添加多个元素static void shuffle(List<?> list):随机打乱单列集合中的元素(每一次运行结果都不一样)static <T> void sort(List<T> list):使用单列集合中的泛型实现的Comparable接口中的方法对集合中的数据进行排序。如果泛型对应的类没有实现Comparable接口,则编译报错static <T> void sort(List<T> list, Comparator<? super T> c):使用自定义实现Comparator接口中的方法对指定集合中的数据进行排序 基本使用如下:
Java 1
2
3
4
5
6
7
8
9
10
11
12
13
14
15
16
17
18
19
20
21
22
23
24
25
26
27
28
29
30
31
32
33
34
35
36
37
38
39
40
41
42 public class Test {
public static void main ( String [] args ) {
ArrayList < String > strings = new ArrayList <> ();
// 1. static <T> boolean addAll(Collection<? super T> c, T... elements)
Collections . addAll ( strings , "abc" , "sac" , "bsd" );
for ( String string : strings ) {
System . out . println ( string );
}
System . out . println ();
// 2. static void shuffle(List<?> list)
Collections . shuffle ( strings );
for ( String string : strings ) {
System . out . println ( string );
}
System . out . println ();
// 3. static <T> void sort(List<T> list)
Collections . sort ( strings ); // String 实现了 Comparable接口
for ( String string : strings ) {
System . out . println ( string );
}
System . out . println ();
// 4. static <T> void sort(List<T> list, Comparator<? super T> c)
ArrayList < Person > people = new ArrayList <> ();
people . add ( new Person ( 23 , "张三" ));
people . add ( new Person ( 12 , "李四" ));
people . add ( new Person ( 45 , "王五" ));
Collections . sort ( people , new Comparator < Person > () {
@Override
public int compare ( Person o1 , Person o2 ) {
return o1 . getAge () - o2 . getAge ();
}
});
for ( Person person : people ) {
System . out . println ( person );
}
}
}
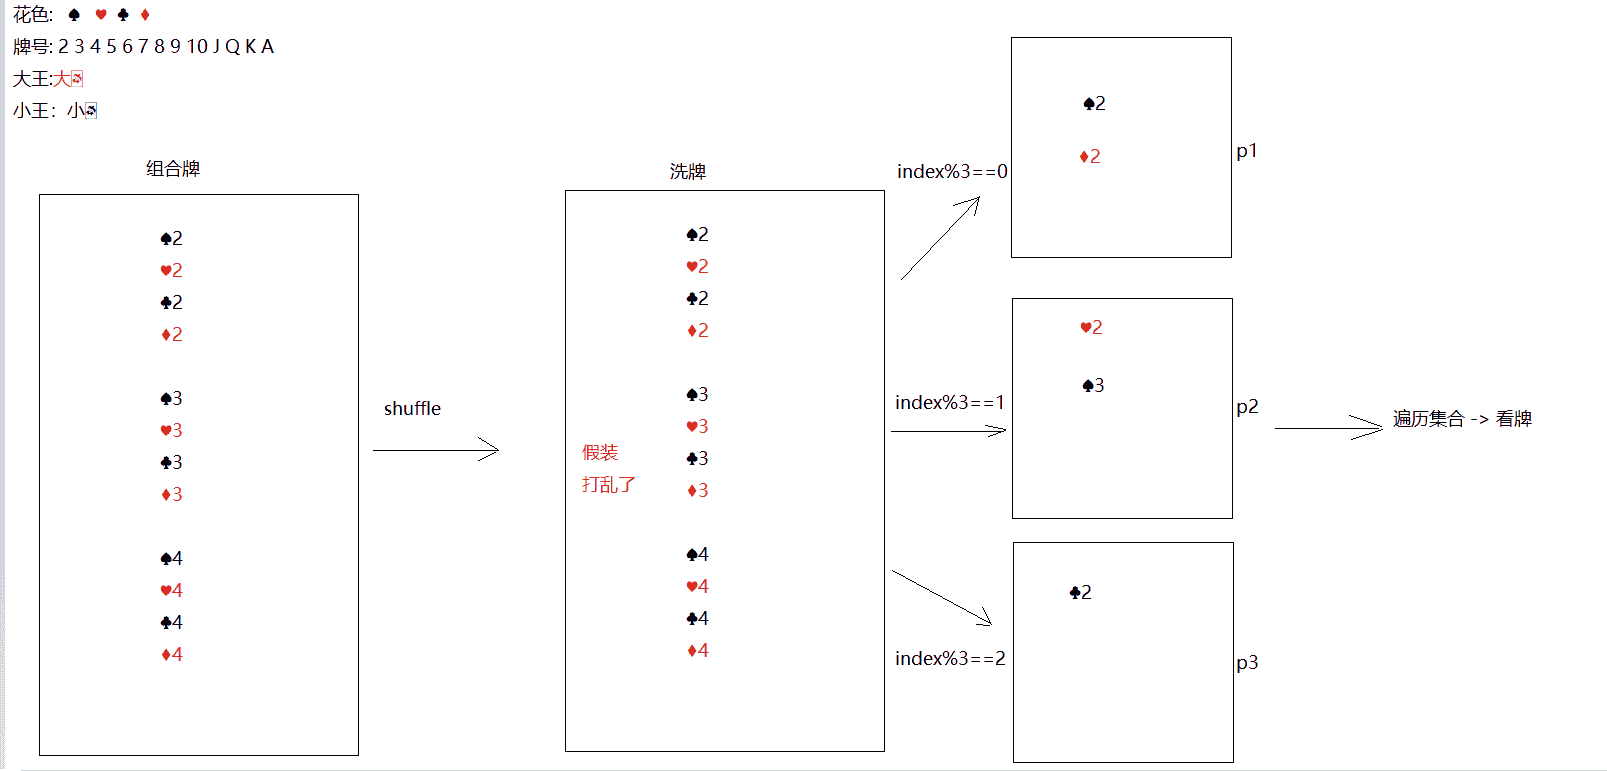
斗地主案例 案例介绍:
按照斗地主的规则,完成洗牌发牌的动作。 具体规则:
使用54张牌打乱顺序,三个玩家参与游戏,三人交替摸牌,每人17张牌,最后三张留作底牌
案例分析:
Java 1
2
3
4
5
6
7
8
9
10
11
12
13
14
15
16
17
18
19
20
21
22
23
24
25
26
27
28
29
30
31
32
33
34
35
36
37
38
39
40
41
42
43
44
45
46
47
48
49
50 public class Test_Poker {
public static void main ( String [] args ) {
// 创建花色
ArrayList < String > color = new ArrayList <> ();
Collections . addAll ( color , "黑桃" , "红心" , "梅花" , "方块" );
// 创建号牌
ArrayList < String > number = new ArrayList <> ();
Collections . addAll ( number , "2" , "A" , "K" , "Q" , "J" , "10" , "9" , "8" , "7" , "6" , "5" , "4" , "3" );
// 创建牌盒
ArrayList < String > pokerBox = new ArrayList <> ();
// 大小王
pokerBox . add ( "大王" );
pokerBox . add ( "小王" );
// 发牌
for ( String s : color ) {
for ( String string : number ) {
pokerBox . add ( s + string );
}
}
// 打乱牌盒
Collections . shuffle ( pokerBox );
// 创建玩家
ArrayList < String > player1 = new ArrayList <> ();
ArrayList < String > player2 = new ArrayList <> ();
ArrayList < String > player3 = new ArrayList <> ();
ArrayList < String > last = new ArrayList <> ();
System . out . println ( pokerBox . size ());
// 发牌,留三张底牌
for ( int i = 0 ; i < pokerBox . size (); i ++ ) {
if ( i >= 51 ) {
last . add ( pokerBox . get ( i ));
} else if ( i % 3 == 0 ) {
player1 . add ( pokerBox . get ( i ));
} else if ( i % 3 == 1 ) {
player2 . add ( pokerBox . get ( i ));
} else {
player3 . add ( pokerBox . get ( i ));
}
}
// 查看
System . out . println ( "player1: " + player1 );
System . out . println ( "player2: " + player2 );
System . out . println ( "player3: " + player3 );
System . out . println ( "last: " + last );
}
}
也可以使用字符分割方法对创建花色和创建号牌进行优化
Java 1
2
3
4
5
6
7
8
9
10
11
12
13
14
15
16
17
18
19
20
21
22
23
24
25
26
27
28
29
30
31
32
33
34
35
36
37
38
39
40
41
42
43
44
45
46 public class Test_Poker01 {
public static void main ( String [] args ) {
// 创建花色
String [] color = "黑桃-红心-梅花-方块" . split ( "-" );
// 创建号牌
String [] number = "2-3-4-5-6-7-8-9-10-J-Q-K-A" . split ( "-" );
// 创建牌盒
ArrayList < String > pokerBox = new ArrayList <> ();
// 添加大小王
pokerBox . add ( "大王" );
pokerBox . add ( "小王" );
// 组合其他牌
for ( String s : color ) {
for ( String n : number ) {
pokerBox . add ( s + n );
}
}
// 创建玩家并发牌
ArrayList < String > player1 = new ArrayList <> ();
ArrayList < String > player2 = new ArrayList <> ();
ArrayList < String > player3 = new ArrayList <> ();
// 底牌
ArrayList < String > last = new ArrayList <> ();
for ( int i = 0 ; i < pokerBox . size (); i ++ ) {
if ( i >= 51 ) {
last . add ( pokerBox . get ( i ));
} else if ( i % 3 == 0 ) {
player1 . add ( pokerBox . get ( i ));
} else if ( i % 3 == 1 ) {
player2 . add ( pokerBox . get ( i ));
} else {
player3 . add ( pokerBox . get ( i ));
}
}
// 查看
System . out . println ( "player1: " + player1 );
System . out . println ( "player2: " + player2 );
System . out . println ( "player3: " + player3 );
System . out . println ( "last: " + last );
}
}