跳转至

C++并发支持库

约 11939 个字 1388 行代码 4 张图片 预计阅读时间 57 分钟

Note

阅读本篇文章之前建议有一定的线程编程基础,此处可以参考Linux线程部分

线程库<thread>

在C++11中,引入了线程库<thread>,用于实现多线程编程。该库提供了一组类和函数,用于创建、管理和同步线程

构造函数

对于创建一个线程来说,可以使用thread类的构造函数,常见的构造如下:

构造函数 说明
thread() noexcept; 默认构造函数,创建一个空的线程对象,不关联任何实际线程
template <class Function, class... Args> explicit thread(Function&& f, Args&&... args); 创建一个线程并执行指定的可调用对象(函数、lambda表达式、函数对象等)及其参数。参数会被完美转发到可调用对象中
thread(const thread&) = delete; 禁止拷贝构造函数,线程对象不可被复制
thread(thread&& x) noexcept; 移动构造函数,将另一个线程对象的所有权转移到当前线程对象中。原线程对象变为未关联任何线程的状态

默认构造函数

C++
1
2
// 简单例子
std::thread t;
创建一个空的线程对象,此时t不关联任何实际线程并且没有任何交给新线程执行的函数。可以通过后续的移动操作(如std::move)将其与一个实际线程关联,例如下面的代码:

C++
 1
 2
 3
 4
 5
 6
 7
 8
 9
10
11
12
13
14
15
16
17
18
19
20
21
22
23
24
#include <iostream>
#include <thread>

void test()
{
    std::cout << "test" << std::endl;
}

// 注释
int main()
{
    // 创建空的线程
    std::thread t;

    // 后续需要使用上面的线程需要单独再创建一个线程
    std::thread t1(test);
    t = std::move(t1);
    // 不能单独复制一个非右值对象
    // t = t1;

    t.join();

    return 0;
}

带可调用对象的构造函数(最常用)

C++
1
2
3
4
5
6
// 简单例子
void foo(int x) 
{ 
    std::cout << x << std::endl; 
}
std::thread t(foo, 42);

第一个参数是一个可调用对象(如函数、lambda表达式、函数对象等),后面的参数是传递给该可调用对象的参数

默认情况下,创建一个线程对象后,该线程会立即执行

但是,需要注意的是,如果函数的参数需要接收的是引用类型,那么在传递参数时一定要确保传递给线程执行函数的参数也是一个引用才能确保引用有效。存在这个问题的本质原因是创建线程时并不是直接将参数传递给线程执行函数,而是经过了一层拷贝,此时线程执行函数接收到的参数是拷贝后的副本,而不是原始参数的引用。为了解决这个问题,可以使用std::ref函数将参数包装成引用类型,这样在线程执行函数中就可以接收到原始参数的引用

C++
 1
 2
 3
 4
 5
 6
 7
 8
 9
10
11
12
13
14
15
16
17
18
19
20
21
22
23
24
25
#include <iostream>
#include <thread>

void test1(int &x)
{
    std::cout << "修改前:x为 " << x << std::endl;
    ++x;
    std::cout << "修改后:x为 " << x << std::endl;
}

// 注释
int main()
{
    int x = 1;

    std::thread t(test1, x);

    t.join();

    return 0;
}

// 输出
修改前x为 1
修改后x为 2

禁止拷贝构造函数

C++
1
2
std::thread t1(foo, 42);
std::thread t2 = t1; // 编译错误
线程对象不可被复制,因为线程资源是独占的,不能同时由多个线程对象管理,但是可以将控制权转移,即使用std::move,具体例子在上面已经给出

移动构造函数

C++
1
2
std::thread t1(foo, 42);
std::thread t2(t1); // t1的所有权转移给t2

上面的例子中,t1的所有权被转移给t2t1变为未关联任何线程的状态

成员函数

以下是C++11中std::thread类的成员函数列表:

成员函数 说明
get_id() const noexcept; 返回线程的ID(std::thread::id类型)。如果线程对象未关联任何线程,则返回默认构造的std::thread::id
joinable() const noexcept; 检查线程是否可被joindetach。如果线程对象关联了一个有效的线程且尚未被joindetach,则返回true;否则返回false
join(); 阻塞当前线程,直到被调用的线程完成执行。调用后,线程对象变为不可join状态(即不再关联任何线程)。每个线程对象只能调用一次join
detach(); 将线程与线程对象分离,使其在后台独立运行。调用后,线程对象不再关联该线程,无法再通过该对象管理线程。每个线程对象只能调用一次detach
swap(thread& other) noexcept; 交换两个线程对象的内容。

示例代码:

C++
 1
 2
 3
 4
 5
 6
 7
 8
 9
10
11
12
13
14
15
16
17
18
19
20
21
22
23
24
25
26
27
28
29
30
31
32
33
34
35
36
37
38
39
40
41
42
43
44
45
46
47
48
49
50
#include <iostream>
#include <thread>
#include <chrono>

void worker(int n) 
{
    std::cout << "线程 " << std::this_thread::get_id() << " 开始工作,参数: " << n << std::endl;
    std::this_thread::sleep_for(std::chrono::seconds(n));
    std::cout << "线程 " << std::this_thread::get_id() << " 工作完成" << std::endl;
}

int main() 
{
    // 默认构造函数创建空线程
    std::thread t1;
    std::cout << "t1 ID: " << t1.get_id() << std::endl;
    std::cout << "t1 是否可join: " << std::boolalpha << t1.joinable() << std::endl;

    // 创建实际工作的线程
    std::thread t2(worker, 2);
    std::cout << "t2 ID: " << t2.get_id() << std::endl;
    // std::boolalpha 是一个格式化标志,用于将布尔值输出为 "true" 或 "false"
    std::cout << "t2 是否可join: " << t2.joinable() << std::endl;

    // 创建另一个工作线程
    std::thread t3(worker, 3);

    // 使用swap交换两个线程
    std::cout << "交换前 - t2 ID: " << t2.get_id() << ", t3 ID: " << t3.get_id() << std::endl;
    t2.swap(t3);
    std::cout << "交换后 - t2 ID: " << t2.get_id() << ", t3 ID: " << t3.get_id() << std::endl;

    // 使用join等待线程完成
    if (t2.joinable()) 
    {
        std::cout << "等待t2完成..." << std::endl;
        t2.join();
        std::cout << "t2已完成" << std::endl;
    }

    // 使用detach分离线程
    if (t3.joinable()) 
    {
        std::cout << "分离t3..." << std::endl;
        t3.detach();
        std::cout << "t3已分离,t3是否可join: " << t3.joinable() << std::endl;
    }

    return 0;
}

参考输出:

Text Only
 1
 2
 3
 4
 5
 6
 7
 8
 9
10
11
12
13
14
t1 ID: 0
t1 是否可join: false
t2 ID: 39880
t2 是否可join: true
交换前 - t2 ID: 39880, t3 ID: 36264
交换后 - t2 ID: 36264, t3 ID: 39880
等待t2完成...
线程 39880 开始工作,参数: 线程 36264 开始工作,参数: 23

线程 39880 工作完成
线程 36264 工作完成
t2已完成
分离t3...
t3已分离,t3是否可join: false

需要注意的是,每个线程对象在其生命周期结束前必须明确调用joindetach,否则程序会调用std::terminate终止运行,例如:

C++
1
2
3
4
std::thread t([] {});
if (t.joinable()) {
    t.join(); // 或者 t.detach();
}

this_thread命名空间

在C++11中,std::this_thread是一个命名空间,提供了与当前线程相关的功能。它主要用于获取当前线程的信息、控制当前线程的执行(如暂停或休眠),以及设置线程的名称(在某些实现中)。以下是std::this_thread命名空间中的主要函数及其功能:

函数 说明
std::this_thread::get_id() 返回当前线程的ID(std::thread::id类型)
std::this_thread::yield() 提示调度器让出当前线程的时间片,允许其他线程运行
std::this_thread::sleep_for(const chrono::duration& rel_time) 让当前线程暂停指定的持续时间
std::this_thread::sleep_until(const chrono::time_point& abs_time) 让当前线程暂停,直到指定的时间点

Note

在上面的函数中,对于yield函数来说,在不同的操作系统上可能会有不同的表现,具体表现取决于操作系统的调度策略和实现,并不是所有的操作系统都保证yield函数一定会让出时间片

示例代码:

C++
 1
 2
 3
 4
 5
 6
 7
 8
 9
10
11
12
13
14
15
16
17
18
19
20
21
22
23
24
25
26
27
28
29
30
31
32
33
34
35
36
37
38
#include <iostream>
#include <thread>
#include <chrono>
#include <iomanip> // 用于格式化输出时间

void print_time(const std::string& message) 
{
    auto now = std::chrono::system_clock::now();
    auto now_c = std::chrono::system_clock::to_time_t(now);
    std::cout << message << " - 时间: " 
              << std::put_time(std::localtime(&now_c), "%H:%M:%S") << std::endl;
}

int main() 
{
    // 1. 获取当前线程ID
    std::cout << "当前线程ID: " << std::this_thread::get_id() << std::endl;

    // 2. 使用yield让出时间片
    std::cout << "准备让出时间片..." << std::endl;
    std::this_thread::yield();
    std::cout << "继续执行..." << std::endl;

    // 3. 使用sleep_for暂停指定时间
    print_time("准备休眠2秒");
    std::this_thread::sleep_for(std::chrono::seconds(2));
    print_time("休眠结束");

    // 4. 使用sleep_until暂停到指定时间点
    auto now = std::chrono::system_clock::now();
    auto wake_time = now + std::chrono::seconds(3);

    print_time("准备休眠到指定时间点(当前时间+3秒)");
    std::this_thread::sleep_until(wake_time);
    print_time("到达指定时间点,继续执行");

    return 0;
}

参考输出:

Text Only
1
2
3
4
5
6
7
当前线程ID: 26096
准备让出时间片...
继续执行...
准备休眠2秒 - 时间: 19:23:48
休眠结束 - 时间: 19:23:50
准备休眠到指定时间点(当前时间+3秒) - 时间: 19:23:50
到达指定时间点,继续执行 - 时间: 19:23:53

互斥锁库<mutex>

在C++11中,标准库提供了多种互斥锁(mutex)类型和相关工具,用于实现线程间的同步。这些互斥锁和工具位于<mutex>头文件中

互斥锁类型

互斥锁类型 说明
std::mutex 最基本的互斥锁类型,提供独占锁定功能。支持lock()unlock()try_lock()操作
std::recursive_mutex 递归互斥锁,允许同一线程多次锁定同一个互斥锁,但必须解锁相同次数才能释放锁。
std::timed_mutex 带超时功能的互斥锁,支持尝试锁定一段时间后放弃(使用try_lock_fortry_lock_until
std::recursive_timed_mutex 结合了递归互斥锁和带超时功能的互斥锁特性

对于基本的mutex来说,使用方式与Linux下的pthread_mutex_t类似,使用lock()加锁,使用unlock()解锁,使用try_lock()尝试加锁,加锁成功返回true,加锁失败返回false。此处不再赘述

下面介绍递归锁和带超时的锁

在一般场景下,直接使用普通的锁完全够用,但是在下面的情况下,如果使用普通的锁,可能会出现死锁的情况,例如:

C++
 1
 2
 3
 4
 5
 6
 7
 8
 9
10
11
12
13
14
15
16
17
18
19
20
21
22
23
24
25
26
27
28
29
#include <mutex>

// 定义一个递归函数
void recursion(int n, std::mutex& mtx, int &x)
{
    // 加锁保护临界区资源
    mtx.lock();
    if (n == 0)
    {
        mtx.unlock();
        return;
    }
    for (int i = 0; i < n; i++)
        ++x;
    recursion(n - 10, mtx, x);
    mtx.unlock();
}

int main()
{
    int n = 100;
    int x = 0;
    std::mutex mtx;
    // 注意使用引用传递
    std::thread t(recursion, n, std::ref(mtx), std::ref(x));

    t.join();
    return 0;
}

在上面的代码中,第一次调用recursion函数时,会加锁保护临界区资源,但是在第一次递归调用时,因为调用递归的位置在释放锁之前,此时当前线程再次进入recursion函数就会开始尝试加锁,但是因为第一次调用并没有释放锁,这就导致当前线程会一直等待锁的释放,这就导致了死锁的情况。这也侧面说明了当前recursion函数是不可重入

基于这个问题,就需要使用递归锁:

C++
 1
 2
 3
 4
 5
 6
 7
 8
 9
10
11
12
13
14
15
16
17
18
19
20
21
22
23
24
25
26
27
28
// 定义一个递归函数
void recursion(int n, std::recursive_mutex& mtx, int &x)
{
    // 加锁保护临界区资源
    mtx.lock();
    if (n == 0)
    {
        mtx.unlock(); // 确保在返回前解锁
        return;
    }
    for (int i = 0; i < n; i++)
        ++x;
    recursion(n - 10, mtx, x);
    mtx.unlock();
}

int main()
{
    int n = 100;
    int x = 0;
    // 使用递归锁
    std::recursive_mutex mtx;
    // 注意使用引用传递
    std::thread t(recursion, n, std::ref(mtx), std::ref(x));

    t.join();
    return 0;
}

接下来是超时锁timed_mutex,超时锁本质就是不让线程持续阻塞,而是在指定的时间内尝试加锁,如果加锁成功就继续执行,如果加锁失败就返回。例如下面的代码:

C++
 1
 2
 3
 4
 5
 6
 7
 8
 9
10
11
12
13
14
15
16
17
18
19
20
21
22
23
24
25
26
27
28
29
void test(int n, std::timed_mutex &tmtx, int &x)
{
    // 不要直接使用lock
    // tmtx.lock();
    // 使用try_lock_for
    while (tmtx.try_lock_for(std::chrono::milliseconds(1000));)
    {
        for (int i = 0; i < n; i++)
            ++x;
    }

    tmtx.unlock();
}

int main()
{
    std::timed_mutex tmtx;
    int x = 1;
    int n = 100;

    std::thread t(test, n, std::ref(tmtx), std::ref(x));

    std::thread t1(test, n, std::ref(tmtx), std::ref(x));

    t.join();
    t1.join();

    return 0;
}

需要注意的是,如果使用超时锁想实现防止线程阻塞在等待锁的过程,需要使用try_lock_for或者try_lock_until,如果直接使用timed_mutexlock系列接口,那么timed_mutex和普通的mutex没有任何区别

互斥锁相关工具

工具类型 说明
std::lock_guard<std::mutex> 简单的RAII风格锁管理器,自动在构造时加锁,在析构时解锁。不可手动解锁。
std::unique_lock<std::mutex> 更灵活的RAII风格锁管理器,支持延迟加锁、手动解锁以及与条件变量配合使用。

对于lock_guard来说,在Linux线程互斥与同步已经模拟实现了一份MutexGuard,基本原理就类似于MutexGuard

接下来主要看unique_lockunique_lock可以理解为是lock_guard的一种升级版本,基本使用方式和lock_guard类似,所以这里就不再介绍基本使用方式

unique_lock的灵活性在于它可以由程序员控制加锁和解锁的时机,例如下面的三种构造函数:

  1. unique_lock (mutex_type& m, try_to_lock_t tag);:尝试加锁,如果加锁失败就不会阻塞当前线程,底层调用的是try_lock。但是try_lock_t因为是非阻塞的,不论是否获取到锁,都会返回一个unique_lock对象,即这个unique_lock是否真的已经管理到指定锁对象是未知的,所以需要判断是否加锁成功。具体如何判断在下面会具体介绍
  2. unique_lock (mutex_type& m, defer_lock_t tag) noexcept;:缓上锁,即unique_lock接收一个锁对象时不会对这个锁进行加锁,具体加锁时机由程序员决定,但是会自动释放锁对象
  3. unique_lock (mutex_type& m, adopt_lock_t tag);:领养锁,即此时unique_lock可以接受一个(假设)已经加锁的锁对象,并且会自动释放锁对象

要使用上面的三种构造函数,需要使用三种类型:

  1. try_to_lock
  2. defer_lock
  3. adopt_lock

首先看后两个defer_lockadopt_lock,示例代码如下:

C++
 1
 2
 3
 4
 5
 6
 7
 8
 9
10
11
12
13
14
15
16
17
18
19
20
21
22
23
24
25
26
27
28
29
30
31
32
33
34
35
36
37
38
39
40
41
42
43
44
45
46
47
48
49
50
51
52
53
54
55
56
57
58
59
60
61
62
63
64
65
66
67
68
69
70
71
72
73
std::mutex mtx;
// 1. defer_lock_t 示例:延迟加锁
void defer_lock_example(int id)
{
    // 创建锁但不立即加锁
    std::unique_lock<std::mutex> lock(mtx, std::defer_lock);

    // 执行一些不需要锁的操作
    std::cout << "线程 " << id << " 正在执行不需要锁的操作..." << std::endl;
    std::this_thread::sleep_for(std::chrono::milliseconds(200));

    // 在需要的时候手动加锁
    std::cout << "线程 " << id << " 尝试获取锁..." << std::endl;
    lock.lock();
    std::cout << "线程 " << id << " 获取到了锁" << std::endl;

    // 执行需要锁保护的操作
    std::this_thread::sleep_for(std::chrono::milliseconds(500));

    // 可以手动解锁
    lock.unlock();
    std::cout << "线程 " << id << " 手动释放了锁" << std::endl;

    // 执行更多不需要锁的操作
    std::this_thread::sleep_for(std::chrono::milliseconds(200));

    // 可以再次加锁
    lock.lock();
    std::cout << "线程 " << id << " 再次获取到了锁" << std::endl;
    std::this_thread::sleep_for(std::chrono::milliseconds(300));

    // 锁会在unique_lock析构时自动释放
}

// 2. adopt_lock_t 示例:接管已加锁的互斥量
void adopt_lock_example(int id)
{
    // 先手动加锁
    mtx.lock();
    std::cout << "线程 " << id << " 手动获取了锁" << std::endl;

    // 创建unique_lock并接管已加锁的互斥量
    {
        std::unique_lock<std::mutex> lock(mtx, std::adopt_lock);
        std::cout << "线程 " << id << " 的unique_lock接管了锁的所有权" << std::endl;

        // 执行需要锁保护的操作
        std::this_thread::sleep_for(std::chrono::milliseconds(800));

        std::cout << "线程 " << id << " 即将退出作用域,锁将被自动释放" << std::endl;
        // 锁会在unique_lock析构时自动释放
    }

    // 此时锁已被释放,可以执行其他操作
    std::cout << "线程 " << id << " 的锁已被释放" << std::endl;
}

int main()
{
    std::cout << "\n=== defer_lock 示例 ===" << std::endl;
    {
        std::thread t(defer_lock_example, 1);
        t.join();
    }

    std::cout << "\n=== adopt_lock 示例 ===" << std::endl;
    {
        std::thread t(adopt_lock_example, 1);
        t.join();
    }

    return 0;
}

参考输出:

Text Only
 1
 2
 3
 4
 5
 6
 7
 8
 9
10
11
12
=== defer_lock 示例 ===
线程 1 正在执行不需要锁的操作...
线程 1 尝试获取锁...
线程 1 获取到了锁
线程 1 手动释放了锁
线程 1 再次获取到了锁

=== adopt_lock 示例 ===
线程 1 手动获取了锁
线程 1 的unique_lock接管了锁的所有权
线程 1 即将退出作用域,锁将被自动释放
线程 1 的锁已被释放

接下来看try_to_lock,在上面提到过,try_to_lock会尝试加锁,需要判断是否加锁成功,这里可以通过调用owns_lock来判断,当然也可以直接通过operator bool来判断,示例代码如下:

C++
 1
 2
 3
 4
 5
 6
 7
 8
 9
10
11
12
13
14
15
16
17
18
19
20
21
22
23
24
25
26
27
28
29
30
31
32
33
34
35
36
37
38
std::mutex mtx;

void try_lock_example(int id)
{
    // 尝试获取锁,如果失败则不阻塞
    std::unique_lock<std::mutex> lock(mtx, std::try_to_lock);

    if (lock.owns_lock()) // 可以直接使用if(lock),调用operator bool
    {
        // 成功获取到锁
        std::cout << "线程 " << id << " 获取到了锁" << std::endl;
        std::this_thread::sleep_for(std::chrono::milliseconds(1000));
        std::cout << "线程 " << id << " 完成工作并释放锁" << std::endl;
    }
    else 
    {
        // 未能获取到锁
        std::cout << "线程 " << id << " 未能获取锁,执行替代操作" << std::endl;
        std::this_thread::sleep_for(std::chrono::milliseconds(500));
    }
    // 锁会在unique_lock析构时自动释放(如果已获取)
}

int main()
{
    std::cout << "=== try_to_lock 示例 ===" << std::endl;
    {
        // 创建两个线程同时尝试获取锁
        std::thread t1(try_lock_example, 1);
        std::this_thread::sleep_for(std::chrono::milliseconds(100)); // 确保t1先运行
        std::thread t2(try_lock_example, 2);

        t1.join();
        t2.join();
    }

    return 0;
}

参考输出:

Text Only
1
2
3
4
=== try_to_lock 示例 ===
线程 1 获取到了锁
线程 2 未能获取锁,执行替代操作
线程 1 完成工作并释放锁

除了上面的三种构造函数,unique_lock还提供了一些其他的成员函数:

  1. release():释放当前锁对象,并且返回该锁对象指针,不再管理该锁(需要程序员自己释放锁)
  2. mutex():获取unique_lock管理的锁对象的指针

这两个成员函数使用相对容易,此处不过多介绍

防止死锁的模板函数locktry_lock

下面是对这两个函数的介绍:

  1. lock():该函数可以接收多个锁对象(不仅限于mutex,还可以传递可以unique_lock),函数内部会对每一个锁对象依次加锁,如果有任何一个锁加锁失败,那么之前已经加锁成功的锁对象都会自动解锁并阻塞当前线程,直到所有锁都加锁成功
  2. try_lock():该函数的作用与lock()主要功能一致。唯独不同的是,该函数加锁失败不会阻塞当前线程,并且会返回第一个加锁失败的锁对象的编号(第一把锁编号从0开始),如果所有锁都加锁成功,那么该函数会返回-1

例如在下面的例子中:

C++
 1
 2
 3
 4
 5
 6
 7
 8
 9
10
11
12
13
14
15
16
17
18
19
20
21
22
23
24
25
26
27
28
29
30
31
32
33
34
35
36
37
38
39
40
41
42
43
std::mutex mtx1;
std::mutex mtx2;

void test1()
{
    std::unique_lock<std::mutex> lock1(mtx1, std::defer_lock);
    lock1.lock();
    // 当前线程休眠1s确保test2先获取到mtx2
    std::this_thread::sleep_for(std::chrono::seconds(1));
    std::unique_lock<std::mutex> lock2(mtx2, std::defer_lock);
    lock2.lock();

    for (int i = 0; i < 10; i++)
        std::cout << std::this_thread::get_id() << "正在执行" << std::endl;

    lock2.unlock();
    lock1.unlock();
}

void test2()
{
    std::unique_lock<std::mutex> lock2(mtx2, std::defer_lock);
    lock2.lock();
    std::unique_lock<std::mutex> lock1(mtx1, std::defer_lock);
    lock1.lock();

    for (int i = 0; i < 10; i++)
        std::cout << std::this_thread::get_id() << "正在执行" << std::endl;

    lock1.unlock();
    lock2.unlock();
}

int main()
{
    std::thread t1(test1);
    std::thread t2(test2);

    t1.join();
    t2.join();

    return 0;
}

编译运行上面的代码会发现出现了死锁现象,即假设t1线程先执行,t2线程后执行,那么t1线程首先会获取到lock1,接着休眠1秒,此时t2线程获取到了lock2,接着,当t1尝试获取lock2时发现lock2已经被取走,所以t1线程阻塞在获取lock2的位置,同理,t2线程也会阻塞在获取lock1的位置

出现死锁的本质原因就是t1t2在等待其他锁的时候并没有释放当前锁,而是加锁阻塞,所以需要的逻辑就是当前线程一旦加锁失败就释放当前已经持有的锁对象或者不使用会引起线程阻塞的加锁方式,更推荐第一种思路,下面给出两种思路的实现:

C++
 1
 2
 3
 4
 5
 6
 7
 8
 9
10
11
12
13
14
15
16
17
18
19
20
21
22
23
24
25
26
27
28
29
std::mutex mtx1;
std::mutex mtx2;

void test1()
{
    std::unique_lock<std::mutex> lock1(mtx1, std::defer_lock);
    std::this_thread::sleep_for(std::chrono::seconds(1));
    std::unique_lock<std::mutex> lock2(mtx2, std::defer_lock);
    std::lock(lock1, lock2);

    for (int i = 0; i < 10; i++)
        std::cout << std::this_thread::get_id() << "正在执行test1" << std::endl;

    lock2.unlock();
    lock1.unlock();
}

void test2()
{
    std::unique_lock<std::mutex> lock2(mtx2, std::defer_lock);
    std::unique_lock<std::mutex> lock1(mtx1, std::defer_lock);
    std::lock(lock1, lock2);

    for (int i = 0; i < 10; i++)
        std::cout << std::this_thread::get_id() << "正在执行test2" << std::endl;

    lock1.unlock();
    lock2.unlock();
}
C++
 1
 2
 3
 4
 5
 6
 7
 8
 9
10
11
12
13
14
15
16
17
18
19
20
21
22
23
24
25
26
27
28
29
30
31
32
33
std::mutex mtx1;
std::mutex mtx2;

void test1()
{
    std::unique_lock<std::mutex> lock1(mtx1, std::defer_lock);
    std::this_thread::sleep_for(std::chrono::seconds(1));
    std::unique_lock<std::mutex> lock2(mtx2, std::defer_lock);
    int num = std::try_lock(lock1, lock2);

    if (num == -1)
    {
        for (int i = 0; i < 10; i++)
            std::cout << std::this_thread::get_id() << "正在执行test1" << std::endl;
        lock1.unlock();
        lock2.unlock();
    }
}

void test2()
{
    std::unique_lock<std::mutex> lock2(mtx2, std::defer_lock);
    std::unique_lock<std::mutex> lock1(mtx1, std::defer_lock);
    int num = std::try_lock(lock1, lock2);

    if (num == -1)
    {
        for (int i = 0; i < 10; i++)
            std::cout << std::this_thread::get_id() << "正在执行test2" << std::endl;
        lock1.unlock();
        lock2.unlock();
    }
}
C++
 1
 2
 3
 4
 5
 6
 7
 8
 9
10
11
12
13
14
15
16
17
18
19
20
21
22
23
24
25
26
27
28
29
30
31
32
33
34
35
36
37
38
39
40
41
42
43
44
std::mutex mtx1;
std::mutex mtx2;

void test1()
{
    std::this_thread::sleep_for(std::chrono::seconds(1));
    std::unique_lock<std::mutex> lock1(mtx1, std::defer_lock);
    // 使用try_lock
    lock1.try_lock();
    std::unique_lock<std::mutex> lock2(mtx2, std::defer_lock);
    // 使用try_lock
    lock2.try_lock();

    // 全部加锁才会执行
    if (lock1 && lock2)
    {
        for (int i = 0; i < 10; i++)
            std::cout << std::this_thread::get_id() << "正在执行test1" << std::endl;
    }

    // 持有锁的释放
    // 放在上一个if的外面,确保已经获取的锁都可以被释放
    if(lock2)
        lock2.unlock();
    if (lock1)
        lock1.unlock();
}

void test2()
{
    std::unique_lock<std::mutex> lock2(mtx2, std::defer_lock);
    lock2.try_lock();
    std::unique_lock<std::mutex> lock1(mtx1, std::defer_lock);
    lock1.try_lock();

    if(lock1 && lock2)
        for (int i = 0; i < 10; i++)
            std::cout << std::this_thread::get_id() << "正在执行正在执行test2" << std::endl;

    if (lock1)
        lock1.unlock();
    if (lock2)
        lock2.unlock();
}

同一个线程内只执行一次的模版函数call_once

如果想让多个线程只执行一次某个函数,那么就需要使用call_oncecall_once的使用方式如下:

C++
 1
 2
 3
 4
 5
 6
 7
 8
 9
10
11
12
13
14
15
16
17
18
19
20
21
22
23
24
25
26
27
28
29
30
#include <iostream>
#include <thread>
#include <mutex>

// 声明一个once_flag变量作为是否是第一次调用的标志
std::once_flag flag;

void initialize()
{
    std::cout << std::this_thread::get_id() << "Initializing..." << std::endl;
}

void thread_func() 
{
    // 确保 initialize 函数只被调用一次
    std::call_once(flag, initialize);
}

int main() 
{
    std::thread t1(thread_func);
    std::thread t2(thread_func);
    std::thread t3(thread_func);

    t1.join();
    t2.join();
    t3.join();

    return 0;
}

在上面的代码中,在这个例子中,尽管有三个线程同时调用thread_func,但由于使用了std::call_onceinitialize函数只会被执行一次。该函数的工作过程可以理解为:每个std::once_flag对象都有一个内部状态,用于记录该标志是否已经被“触发”。当多个线程同时调用std::call_once时,只有一个线程能够成功执行传入的函数,其他线程会等待直到该函数执行完毕。一旦某个线程成功执行了函数,后续对该std::call_once的调用将不再执行该函数

原子操作库<atomic>

基本介绍

虽然可以通过上面的互斥锁来保证线程安全,但是加锁和释放锁本质也是资源竞争,在一定程度上会影响程序的性能,对于临界区只有一些比较简单的操作,例如变量的自增等,加锁的思路反而不是最优的,但是不加锁会存在线程安全问题(比如多个线程同时对变量自增)。为了解决这个问题,除了有互斥锁之外,还可以使用原子操作,毕竟之所以需要互斥锁,本质就是执行的代码不能保证是原子的,一旦能保证操作是原子的,那么就可以不需要使用互斥锁

C++ 11中提供了原子操作库,在该库中关键的结构是atomic,这个类是一个模版类,但是并不代表所有类型的操作都可以保证是原子的。atomic对模版类型的要求是模板可用任何满足可复制构造(CopyConstructible)及可复制赋值(CopyAssignable)的可平凡复制(TriviallyCopyable)类型实例化,模板类型用以下几个函数判断时,如果任意一个返回false,则用于atomic不是原子操作:

C++
1
2
3
4
5
6
std::is_trivially_copyable<T>::value
std::is_copy_constructible<T>::value
std::is_move_constructible<T>::value
std::is_copy_assignable<T>::value
std::is_move_assignable<T>::value
std::is_same<T, typename std::remove_cv<T>::type>::value

例如下面的测试代码:

C++
 1
 2
 3
 4
 5
 6
 7
 8
 9
10
11
12
13
14
15
16
17
18
19
20
21
22
23
24
25
26
27
28
29
30
31
32
33
#include <string>

struct Date
{
    int _year = 1;
    int _month = 1;
    int _day = 1;
};

template<class T>
void check()
{
    std::cout << typeid(T).name() << std::endl;
    std::cout << std::boolalpha << std::is_trivially_copyable<T>::value << std::endl; 
    std::cout << std::boolalpha << std::is_copy_constructible<T>::value << std::endl; 
    std::cout << std::boolalpha << std::is_move_constructible<T>::value << std::endl; 
    std::cout << std::boolalpha << std::is_copy_assignable<T>::value << std::endl; 
    std::cout << std::boolalpha << std::is_move_assignable<T>::value << std::endl; 
    std::cout << std::boolalpha << std::is_same<T, typename std::remove_cv<T>::type>::value << std::endl << std::endl;
}

int main()
{
    check<int>();
    check<double>();
    check<int*>();
    check<Date>();
    check<Date*>();
    check<std::string>();
    check<std::string*>();

    return 0;
}

输出如下:

Text Only
 1
 2
 3
 4
 5
 6
 7
 8
 9
10
11
12
13
14
15
16
17
18
19
20
21
22
23
24
25
26
27
28
29
30
31
32
33
34
35
36
37
38
39
40
41
42
43
44
45
46
47
48
49
50
51
52
53
54
55
int
true
true
true
true
true
true

double
true
true
true
true
true
true

int * __ptr64
true
true
true
true
true
true

struct Date
true
true
true
true
true
true

struct Date * __ptr64
true
true
true
true
true
true

class std::basic_string<char,struct std::char_traits<char>,class std::allocator<char> >
false
true
true
true
true
true

class std::basic_string<char,struct std::char_traits<char>,class std::allocator<char> > * __ptr64
true
true
true
true
true
true

可以看到string并不满足可平凡复制,所以无法保证string中的操作是原子的,但是对于基本类型基本都是支持原子操作的

原子操作原理

原子操作的基本原理是基于硬件的,在现代的大多数CPU中,都提供了比较交换指令来支持CAS(Compare and Swap)操作,这一点在Linux线程互斥与同步也有提及,在Linux系统和Windows系统下也提供了相应的CAS系统调用:

C
1
2
3
// gcc⽀持的CAS接⼝
bool __sync_bool_compare_and_swap (type *ptr, type oldval, type newval);
type __sync_val_compare_and_swap (type *ptr, type oldval, type newval);
C
1
2
// Windows⽀持的CAS接⼝
InterlockedCompareExchange ( __inout LONG volatile *Target, __in LONG Exchange, __in LONG Comperand);

不论是Linux还是Windows下的CAS系统调用,本质思路都是比较内存中取出的值(Linux下*ptr,Windows下*Target)与预期值(Linux下oldval,Windows下Comperand)是否相等,如果相等说明当前没有线程进行修改,此时就可以将内存中取出的值修改为新的值(Linux下newval,Windows下Exchange)并返回true;如果不相等,那么说明当前值已被其他线程修改,将期望值修改为取出的值,此时不对取出的值做任何修改,仅返回false。CAS操作本身不会自动重试,通常需要调用者在外层使用循环来实现"尝试直到成功"的逻辑

但是,现在还存在另外一个问题:既然*ptroldval都是从内存取的,那么假设有一个线程的确对某个变量进行了修改但是还没有来得及写入内存,此时另外一个线程取出的*ptroldval依旧是一样的,这种情况下另外一个线程也开始对这个值进行了修改,再写入内存不就覆盖了吗?

对于上面的问题,首先明确一个过程,如果CPU要读取到当前变量的值,在现代计算机架构中大部分都是从缓存中读取,而缓存中的数据来自于内存,同样,写入的时候也会先写入缓存,再考虑写入内存

对于读数据和写数据分别有有相关的策略:

Note

注意,缓存未命中时从内存中加载数据并不是一个字节一个字节加载,而是以块为单位进行的,这个块也被称为Cache Block或者称为Cache Line

  • 直读(Read Through)策略:缓存未命中时,直接从内存中读取数据块(Cache Block),而不经过缓存
  • 读分配(Read Alloc)策略:缓存未命中时:先在缓存中申请一块空间,再从内存中将需要的Cache Block读取到该空间中,最后从Cache Block中取出数据进行使用
  • 直写(Write Through)策略

    • 缓存中不存在指定的Cache Block:直接将数据更新到内存中
    • 缓存中存在指定的Cache Block:更新缓存中的数据,再将数据写入到内存
  • 写回(Write Back)策略

    • 缓存中存在指定的Cache Block:将数据更新到缓存中的Cache Block中。将该Cache Block标记为脏,但不向内存中写入

    • 缓存中不存在指定的Cache Block,并且存在其他数据,判断其他的Cache Block是否为脏数据:

      • 是脏数据

        1. 将脏数据写入到内存,
        2. 从内存中重新读取数据块到缓存中,确保下一次缓存中的数据是最新的(这样也可以保证下一次的缓存命中率,而不是每次都从内存中读取)
        3. 将当前要更新的数据写入到对应的Cache Block中
        4. 最后将该Cache Block标记为脏
      • 不是脏数据

        1. 说明此时缓存和内存是一致的
        2. 但是当前缓存并不存在对应的Cache Block,所以将要更新的数据先读取到缓存中
        3. 再将更新的数据写入到对应的Cache Block中
        4. 最后将该Cache Block标记为脏

有了上面的概念之后,再回到上面的问题,现在知道了实际上取数据大部分情况下并不是直接从内存中取,而是从缓存取,那么上面的问题就变成了如果不同的缓存看到的相同的值,并且同时有多个线程进行修改如何保证数据一致?这就涉及到了缓存一致性,所谓缓存一致性就是确保不同的核心拥有的缓存在数据发生改变时能够同步改变,要实现缓存一致性就需要做到下面两点:

  1. 写传播:一旦有数据更新就同步该数据到其他缓存中,但是只有写传播无法保证同步修改的顺序
  2. 事务串行化:确保所有处理器以相同的顺序看到对共享内存的写入操作。这通常通过缓存一致性协议(如MESI、MOESI等)来实现,这些协议会跟踪每个缓存行的状态,并在多个处理器尝试同时修改同一内存位置时协调它们的操作

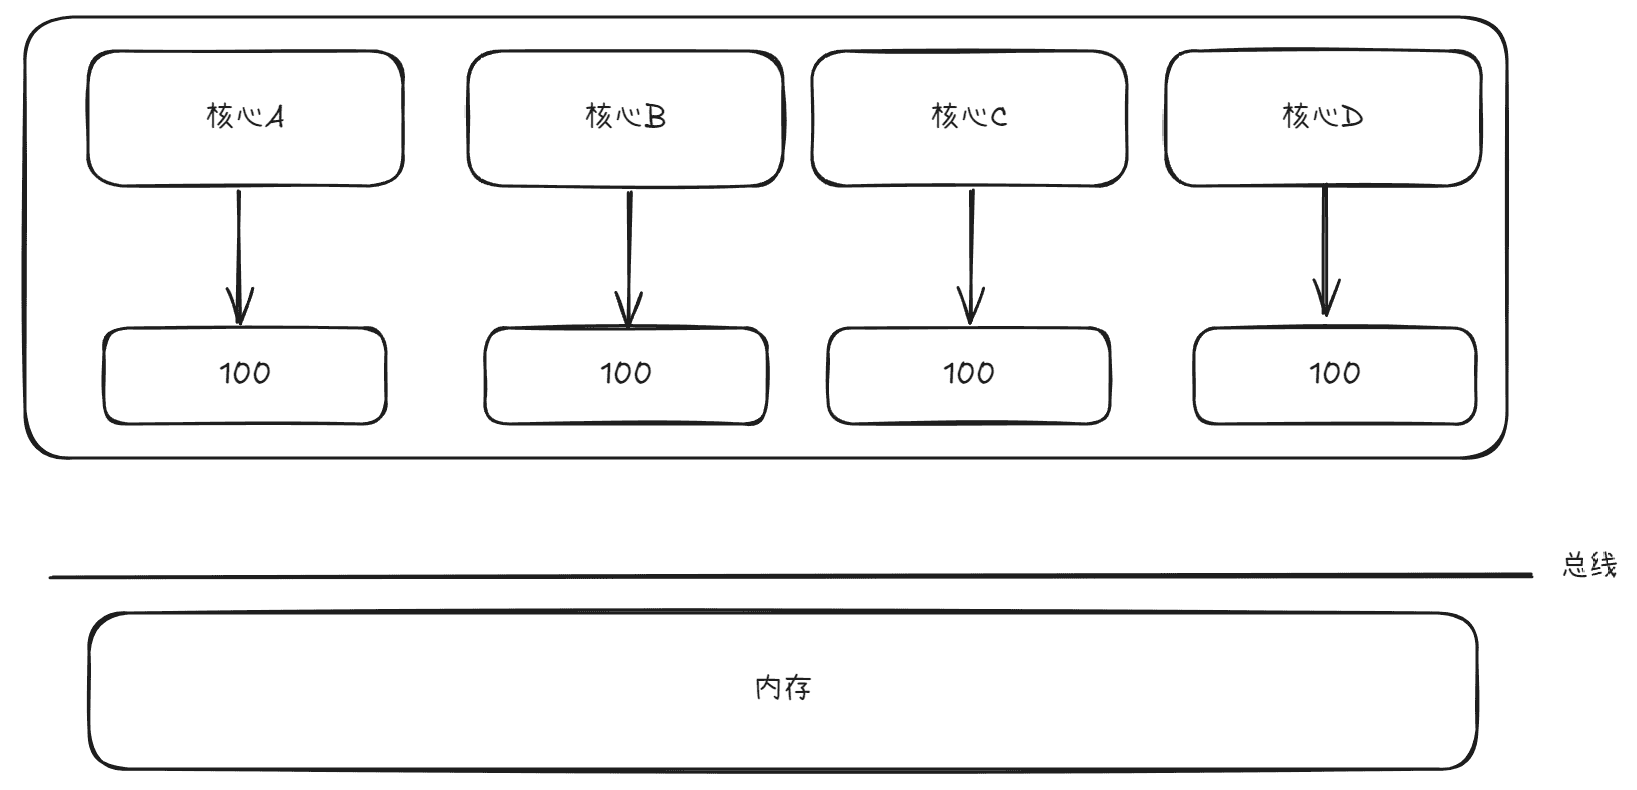
对于写传播来说,比较容易理解,下面主要考虑事务串行化,假设现在存在四个核心,每个核心对应着一个线程,并且都对同一个变量进行修改,该变量初始值为100,如下图所示:

接着核心A和核心B同时对该变量进行修改,核心A将该变量的值修改为200,核心B将该变量的值修改为300,如下图所示:

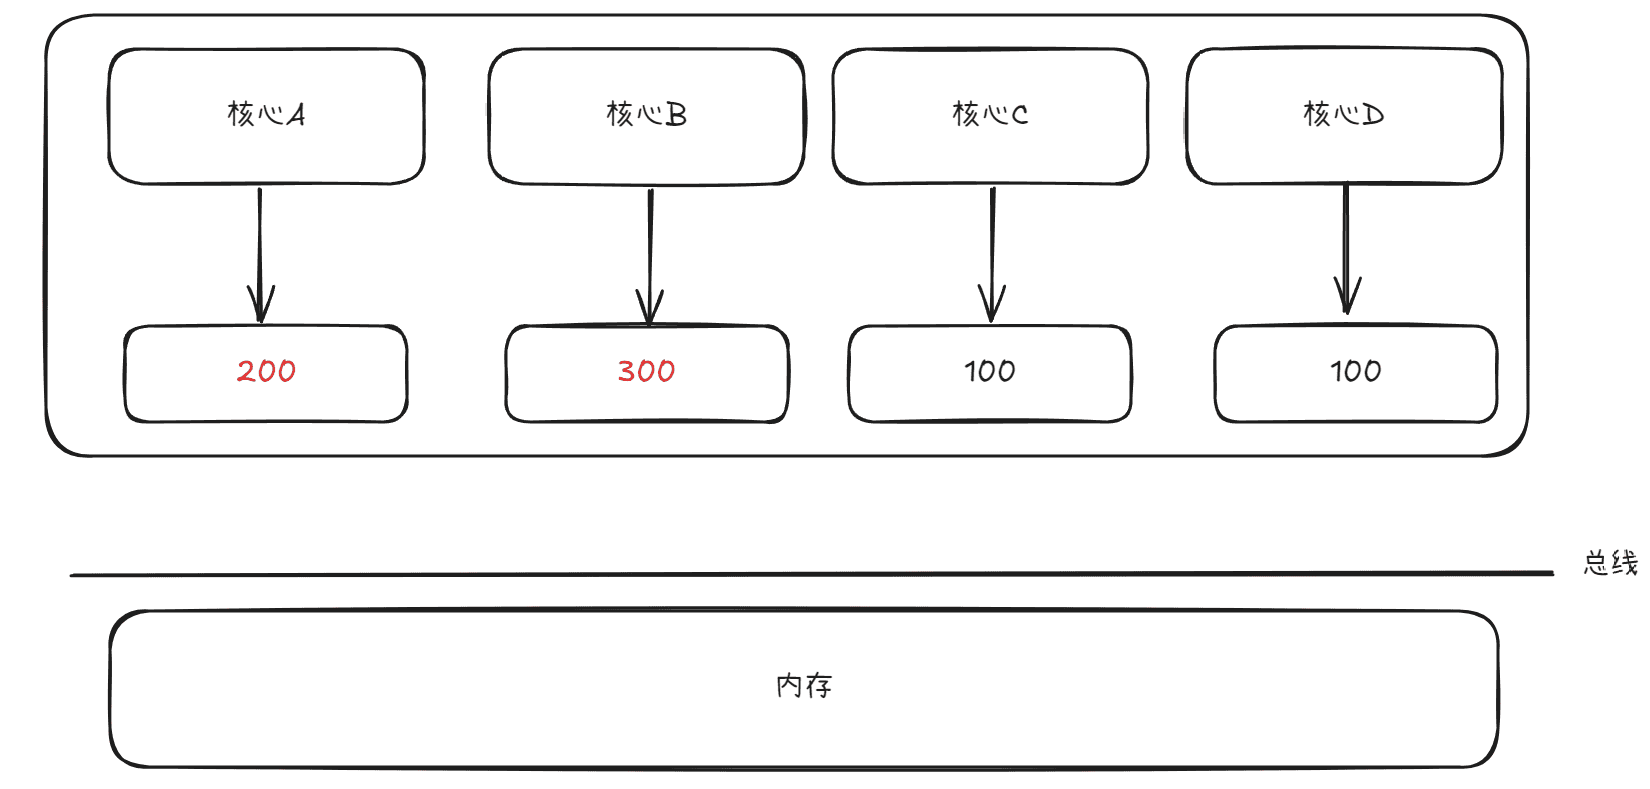
现在对于C和D来说,C可能认为先对该变量修改为200,再修改为300,D可能认为先对该变量修改为300,再修改为200,很明显虽然这样的确做到了写传播,但是却无法不同的核心一定看到的是相同的修改顺序,所以需要用到事务串行化来解决这个问题

实现事务串行化可以使用MESI协议,即:

  1. Modified:已修改,该缓存行已被当前处理器修改,与内存中的值不同(即脏数据)
  2. Exclusive:独占,缓存行仅在当前处理器缓存中存在,但未被修改
  3. Shared:共享,当前数据的缓存行可能存在于多个处理器的缓存中
  4. Invalid:无效,缓存行无效,不包含有效数据

基于MESI协议,就可以做到一个线程对变量进行修改之后通过写传播+事务串行化让其他的核心能够看到该变量的修改

综上所述,实际上CAS操作具体描述为从缓存中加载值与当前的预期值进行比较(如果缓存中不存在需要的数据就从内存中加载),如果预期值和取出的值相等,那么更新取出的值为新值,并通知其他线程数据发生改变(此处涉及到写传播+事务串行化来实现缓存一致性);如果不相同,就更新预期值为当前取出的值,做到预期值数据的更新

原子库中针对CAS操作的函数

在C++11的原子操作库中也提供了有关CAS操作的接口:

函数名 功能描述
compare_exchange_weak(T& expected, T desired, memory_order success, memory_order failure) 如果当前值等于 expected,则将其替换为 desired,否则将 expected 更新为当前值。
可能会虚假失败(硬件原因)
compare_exchange_strong(T& expected, T desired, memory_order success, memory_order failure) 类似于 compare_exchange_weak,但保证不会虚假失败
compare_exchange_weak(T& expected, T desired, memory_order order = memory_order_seq_cst) 简化版,成功和失败使用相同的内存顺序
compare_exchange_strong(T& expected, T desired, memory_order order = memory_order_seq_cst) 简化版,成功和失败使用相同的内存顺序

常用配套的接口如下:

函数名 功能描述
load(memory_order order = memory_order_seq_cst) 读取原子变量的值,可以选择不同的内存顺序。
store(T value, memory_order order = memory_order_seq_cst) 设置原子变量的值,可以选择不同的内存顺序。
exchange(T value, memory_order order = memory_order_seq_cst) 将原子变量的值替换为新值,并返回旧值。
operator T() 隐式转换操作符,将原子对象转换为其存储的值类型,等同于调用load()

例如下面的一个例子:

C++
 1
 2
 3
 4
 5
 6
 7
 8
 9
10
11
12
13
14
15
16
17
18
19
20
21
22
23
24
25
26
27
28
29
30
31
32
33
34
35
36
37
38
39
40
41
42
43
#include <atomic>
#include <vector>

struct Node 
{ 
    int value; 
    Node* next; 
};

std::atomic<Node*> list_head(nullptr);

void insertBefore(int val) 
{     
    // 相当于Node* oldHead = list_head; 这里用到了operator T()函数,将atomic对象转换为存储的内容
    Node* oldHead = list_head.load();
    Node* newNode = new Node{ val,oldHead };

    while (!list_head.compare_exchange_weak(oldHead, newNode))
        newNode->next = oldHead;
}

int main()
{
    std::vector<std::thread> threads;

    for (int i = 0; i < 10; ++i) 
        threads.push_back(std::thread(insertBefore, i));
    for (auto& th : threads) 
        th.join();

    for (Node* it = list_head; it != nullptr; it = it->next)
        std::cout << ' ' << it->value;
    std::cout << '\n';

    Node* it; 
    while (it = list_head) 
    { 
        list_head = it->next; 
        delete it; 
    }

    return 0;
}

参考输出:

Text Only
1
 9 8 6 7 4 5 3 2 1 0

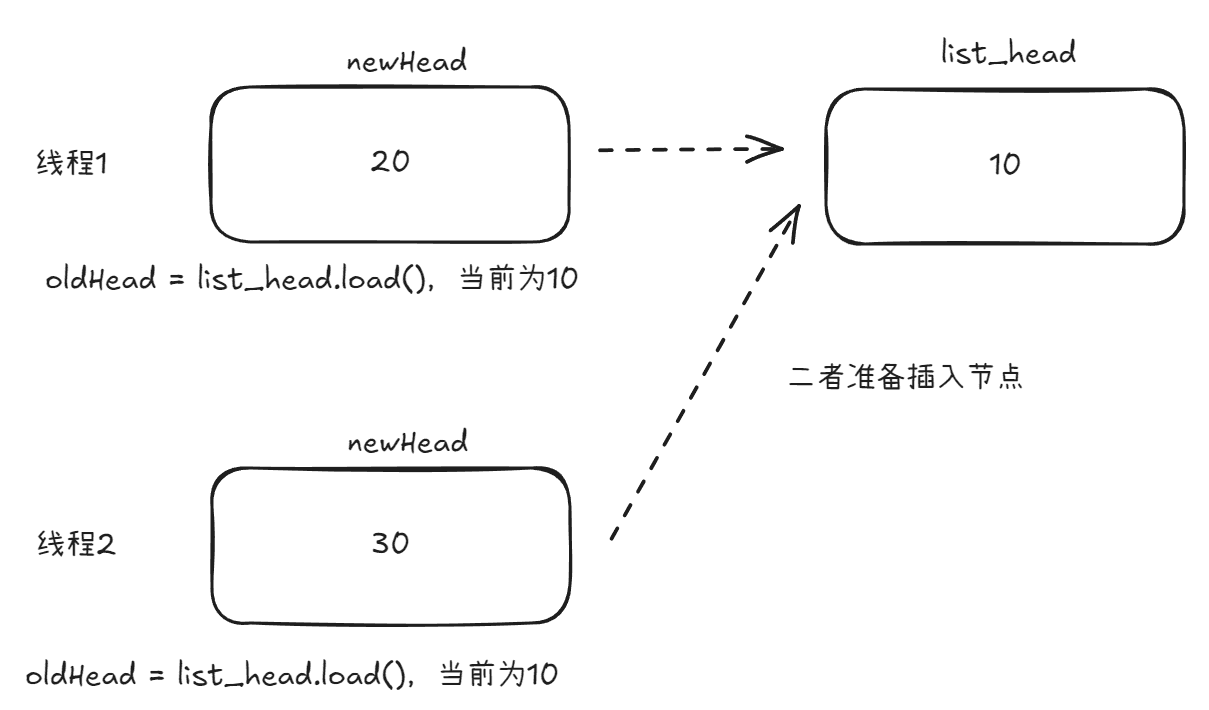
在上面的代码中,使用到了compare_exchange_weak,以其中一段过程为例:首先头结点(list_head)为空,在insertBefore函数中首先获取到旧值oldHead为当前头结点,再创建一个新的节点newHead作为准备插入的节点,接着执行循环部分。因为当前list_head为空,oldHead也为空,所以二者按照内存序列比较时是相等的,根据CAS操作的特点,只要取出的值(此处为list_head)和预期值(此处为oldHead)相等,那么就将新值(此处为newHead)赋值给取出的值,即执行类似于:list_head = newHead,然后返回true不进入循环体

根据上面的过程,现在假设有多个线程同时走到了循环部分,例如下图所示:
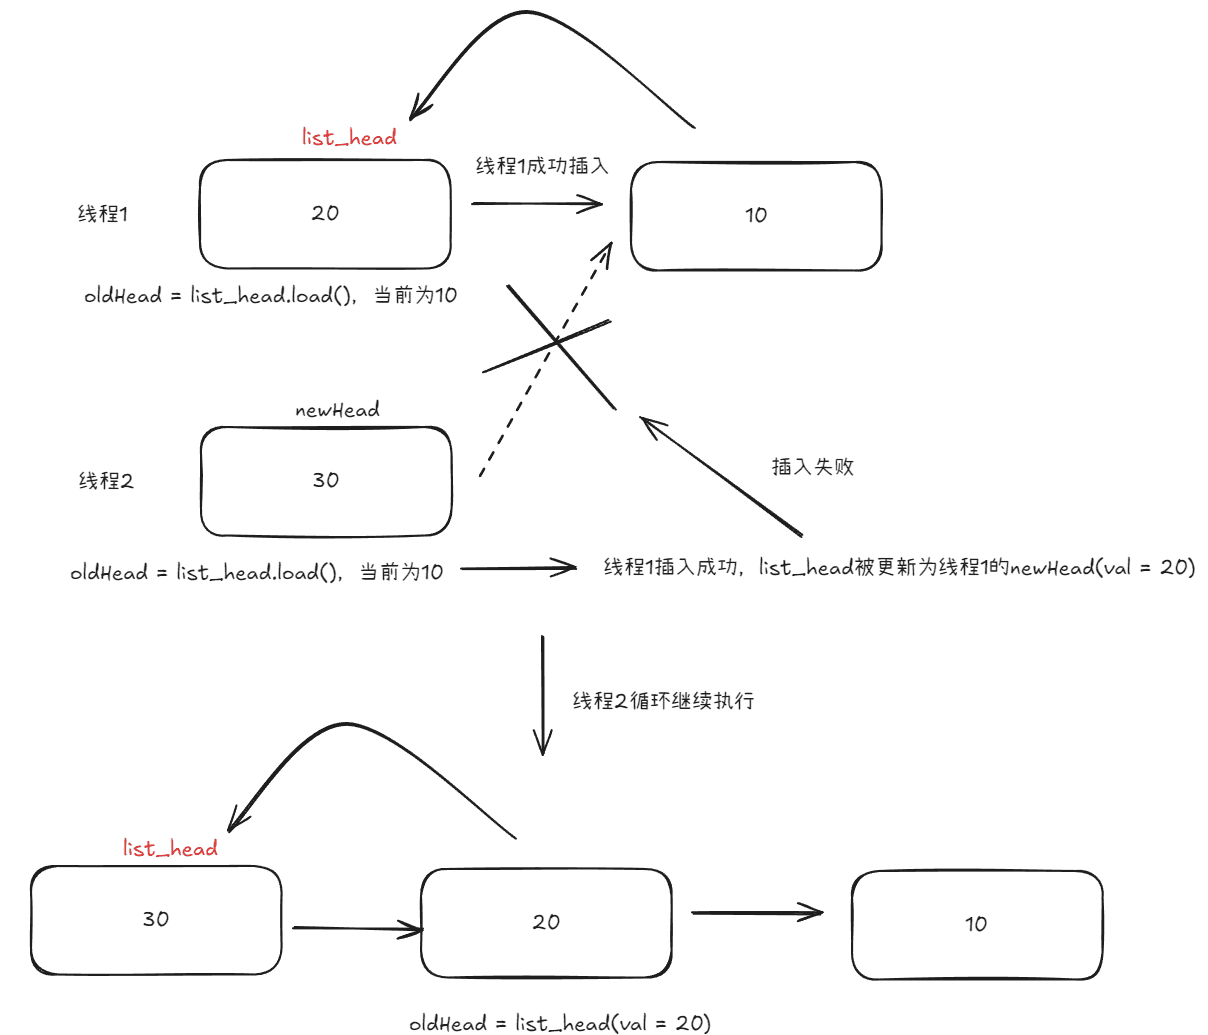
假如线程1先被调度,那么根据CAS操作,判断出oldHeadlist_head相等,那么就会执行list_head = newHead,然后返回true,此时线程1执行完毕,轮到线程2继续从上一次离开的位置执行,即继续执行循环,此时直观来看线程2的oldHead依旧与list_head相同,但是实际上并不是,因为在上面提到过缓存一致性的问题,一旦线程1更新了list_head让其指向了线程1创建的newHead,那么线程2再次执行时取到的list_head是值由线程1创建的值为20的节点,那么很显然,此时取出的值list_head与预期值oldHead不相等,所以线程2这一轮插入失败,但是插入失败还没有结束运行,CAS操作会更新当前线程2的oldHeadlist_head,即oldHead = list_head,此时线程2的oldHead即为值为20的头节点,接着因为CAS这一轮返回false,所以循环继续执行,在这一次循环中,oldHeadlist_head相等,所以会执行list_head = newHead,然后返回true,此时线程2执行完毕,所以整个过程如下:

在上面的例子中已经介绍了CAS函数的基本使用和工作模式,但是上面的CAS函数不止一个,彼此之间最典型的区别首先就是一对是weak结尾,一对是strong结尾,那么二者有什么区别?

特性 compare_exchange_weak compare_exchange_strong
虚假失败 可能发生。即使当前值等于期望值,也可能因硬件/系统原因而失败 不会发生。只有当前值不等于期望值时才会失败
性能 在某些平台上可能更高效 在某些平台可能需要额外开销
适用场景 循环中使用,可接受偶尔重试 失败代价高或不在循环中使用

那么为什么会存在虚假失败?可能的情况有如下几点:

  1. 多处理器系统中的竞争条件:当多个核心同时尝试修改同一缓存行时
  2. 处理器架构限制:某些CPU架构无法直接实现原子的"比较并交换"操作
  3. 系统中断:比较后交换前的时间间隙中发生系统中断

那么如何选择weakstrong这两个版本的CAS函数呢?有下面几点参考:

  • 在循环中使用时,通常选择weak版本,因为虚假失败会在下一轮循环中重试
  • 不在循环中使用重试代价高时,选择strong版本

参考示例:

C++
 1
 2
 3
 4
 5
 6
 7
 8
 9
10
11
std::atomic<int> value(10);
int expected = 10;
int new_value = 20;

// 在循环中使用,重试直到成功
while (!value.compare_exchange_weak(expected, new_value)) 
{
    // 虚假失败会自动更新expected,所以不需要重新加载
    // 如果是真实失败,expected已被更新为最新值
    new_value = expected + 10; // 基于新的expected值重新计算
}
C++
 1
 2
 3
 4
 5
 6
 7
 8
 9
10
11
12
13
std::atomic<int> value(10);
int expected = 10;
int new_value = 20;

// 单次尝试,不在循环中
if (value.compare_exchange_strong(expected, new_value)) 
{
    // 交换成功,value现在是new_value
} 
else 
{
    // 交换失败,expected现在包含value的实际值
}

除了存在weakstrong这两个版本外,在一个版本内部还存在着两个版本,主要区别就在于memory_order的数量。那么什么是memory_order

memory_order是C++11引入的内存顺序模型,用于精确控制多线程程序中原子操作的可见性和执行顺序

所谓内存顺序,就是定义了在多线程环境中,原子操作对内存的访问如何被其他线程观察到,以及这些操作之间如何排序。这对于无锁编程至关重要,因为现代处理器可能会对指令进行重排序以提高性能

内存顺序 含义 性能 保证
memory_order_relaxed 最宽松,仅保证原子性 最高 只保证操作本身的原子性
memory_order_consume 依赖顺序 较高 保证数据依赖关系的顺序
memory_order_acquire 获取顺序 中等 防止读操作被重排到获取操作之前
memory_order_release 释放顺序 中等 防止写操作被重排到释放操作之后
memory_order_acq_rel 获取-释放顺序 较低 结合获取和释放的保证
memory_order_seq_cst 顺序一致性(默认) 最低 所有线程看到的操作顺序完全一致

为什么需要提供不同数量的控制内存顺序?

compare_exchange_weak/strong函数中提供两个内存顺序参数:

C++
1
2
3
bool compare_exchange_weak(T& expected, T desired,
                          memory_order success,
                          memory_order failure);

这是因为:

  1. 成功和失败的场景不同

    • success:指定交换成功时使用的内存顺序
    • failure:指定交换失败时使用的内存顺序
  2. 性能优化:失败操作通常只是一个读操作,不需要与成功操作相同的严格内存序。例如,成功时可能需要memory_order_acq_rel,而失败时只需memory_order_acquire

例如下面的例子:

C++
 1
 2
 3
 4
 5
 6
 7
 8
 9
10
11
12
13
14
15
16
17
18
19
20
21
22
23
24
25
26
27
28
29
30
31
32
33
34
35
36
37
38
#include <atomic>
#include <thread>
#include <iostream>

std::atomic<bool> ready(false);
std::atomic<int> data(0);

void producer() 
{
    // 准备数据
    data.store(42, std::memory_order_relaxed);

    // 使用memory_order_release确保之前的写入对其他线程可见
    ready.store(true, std::memory_order_release);
}

void consumer() 
{
    // 等待数据准备好,使用memory_order_acquire确保能看到之前的写入
    while (!ready.load(std::memory_order_acquire)) 
    {
        // 等待,直到读取到ready为true
    }

    // 此处保证能看到producer中对data的写入
    int result = data.load(std::memory_order_relaxed);
    std::cout << "读取到的数据: " << result << std::endl; // 一定输出42
}

int main() 
{
    std::thread t1(producer);
    std::thread t2(consumer);

    t1.join();
    t2.join();
    return 0;
}

但是,尽管这里提供了那么多种内存顺序,但是大部分情况下直接使用memory_order_seq_cst(最严格)也可以,对性能影响并不是很大,除非是对性能要求非常高的场景

原子操作函数

对于原子操作,在库中也提供了一些操作函数:

原子修改操作(带返回值)

这些函数在修改原子变量的同时返回修改前或修改后的值。

函数名 功能描述
fetch_add(T value, memory_order order = memory_order_seq_cst) 对原子变量执行加法操作,返回加法前的值。
fetch_sub(T value, memory_order order = memory_order_seq_cst) 对原子变量执行减法操作,返回减法前的值。
fetch_and(T value, memory_order order = memory_order_seq_cst) 对原子变量执行按位与操作,返回操作前的值。
fetch_or(T value, memory_order order = memory_order_seq_cst) 对原子变量执行按位或操作,返回操作前的值。
fetch_xor(T value, memory_order order = memory_order_seq_cst) 对原子变量执行按位异或操作,返回操作前的值。

fetch_add为例:

C++
 1
 2
 3
 4
 5
 6
 7
 8
 9
10
11
12
13
14
15
16
17
18
19
20
21
22
23
std::atomic<int> count(0);
std::atomic<int> ret;

void test()
{
    ret = count.fetch_add(1);
}

int main()
{
    std::thread t(test);
    std::thread t1(test);

    std::this_thread::sleep_for(std::chrono::seconds(3));

    std::cout << count << std::endl; // 2
    std::cout << ret << std::endl; // 1

    t.join();
    t1.join();

    return 0;
}

原子标志(std::atomic_flag

std::atomic_flag是一个特殊的原子类型,通常用于实现自旋锁等低级同步机制,初始化时必须要使用ATOMIC_FLAG_INIT

函数名 功能描述
clear(memory_order order = memory_order_seq_cst) std::atomic_flag标志清零(设置为 false
test_and_set(memory_order order = memory_order_seq_cst) std::atomic_flag标志设置为true,并返回之前的值

实际上,std::atomic_flag就是对atomic<bool>的一种封装,下面是分别使用atomic<bool>atomic_flag实现自旋锁:

C++
 1
 2
 3
 4
 5
 6
 7
 8
 9
10
11
12
13
14
15
16
17
18
19
20
21
22
23
24
25
26
27
28
class SpinningLock
{
public:
    SpinningLock()
        :flag_(false)
    {

    }

    void lock() 
    {
        // 期望值为false,一旦flag_为false就会触发CAS操作中期望值和取出的值相同的行为
        // 而flag_为true代表加锁
        bool expected = false;
        // 尝试将flag_从false原子地设置为true
        // 如果失败(即flag_已经是true),则继续循环
        while (!flag_.compare_exchange_weak(expected, true)) 
            expected = false; // 重置expected值用于下一次比较
    }

    void unlock()
    {
        flag_.store(false);
    }

private:
    std::atomic<bool> flag_;
};
C++
 1
 2
 3
 4
 5
 6
 7
 8
 9
10
11
12
13
14
15
16
17
18
19
20
21
22
23
class SpinningLock
{
public:
    SpinningLock()
    { }

    void lock()
    {
        // test_and_set会将flag设为true并持续返回true
        // 除非调用clear
        while (flag_.test_and_set())
        {
        }
    }

    void unlock()
    {
        flag_.clear();
    }

private:
    std::atomic_flag flag_ = ATOMIC_FLAG_INIT;
};

其他辅助函数

这些函数提供了对原子操作的支持,例如等待和通知机制(C++20 引入)

函数名 功能描述
wait(T old, memory_order order = memory_order_seq_cst) (C++20)等待原子变量的值变为指定值
notify_one() (C++20)唤醒一个等待该原子变量的线程
notify_all() (C++20)唤醒所有等待该原子变量的线程

特殊操作(适用于整数和指针类型)

这些操作是针对整数类型的原子变量提供的额外功能

Note

C++20后这些操作可以支持浮点数,而不仅限于整数和指针

函数名 功能描述
operator++operator-- 原子递增或递减操作(前置和后置形式)。
operator+=operator-= 原子加法或减法操作,并返回操作后的值。
operator&=operator=operator^= 原子按位与、或、异或操作,并返回操作后的值。

条件变量库<condition_variable>

条件变量是C++11并发编程中的一种同步机制,用于线程间通信。它允许一个或多个线程等待某个条件满足后再继续执行。条件变量库主要包含在<condition_variable>头文件中

条件变量类

类型 描述
std::condition_variable 标准条件变量,只能与std::unique_lock配合使用
std::condition_variable_any 更灵活的条件变量,可与任何满足基本锁要求的互斥量配合使用

核心操作

操作 描述
wait() 等待条件满足,可能出现虚假唤醒
wait_for() 等待条件满足,但最多等待指定时间
wait_until() 等待条件满足,直到指定时间点
notify_one() 唤醒一个等待的线程
notify_all() 唤醒所有等待的线程

需要注意的是,在标准库的实现中,wait系列接口除了传递一个std::unique_lock对象外,还可以传递一个谓词(predicate),这个谓词是一个可调用对象,用于检查条件是否满足,这种版本的wait接口执行可以类似于下面的情况:

C++
1
2
while(!predicate())
    wait(lock);

通常建议使用带谓词的wait接口,因为这样可以避免伪唤醒的问题,当然如果使用不带谓词的wait接口就需要自己处理虚假唤醒

基本使用模式

C++
 1
 2
 3
 4
 5
 6
 7
 8
 9
10
11
12
13
14
15
16
17
18
19
20
21
22
23
24
25
26
27
28
29
30
31
32
33
34
35
36
37
38
39
40
41
42
43
44
45
46
47
48
49
50
51
52
53
54
55
56
57
58
59
60
61
62
63
64
65
#include <condition_variable>
#include <mutex>
#include <thread>
#include <iostream>
#include <queue>

std::mutex mtx;
std::condition_variable cv;
std::queue<int> data_queue;
bool finished = false;

void producer() {
    for (int i = 1; i <= 10; ++i) 
    {
        {
            std::lock_guard<std::mutex> lock(mtx);
            data_queue.push(i);
            std::cout << "生产者: 插入数据 " << i << std::endl;
        }
        cv.notify_one(); // 通知一个等待的消费者
        std::this_thread::sleep_for(std::chrono::milliseconds(200));
    }

    {
        std::lock_guard<std::mutex> lock(mtx);
        finished = true;
    }
    cv.notify_all(); // 通知所有等待的消费者已经完成
}

void consumer(int id) 
{
    while (true) 
    {
        std::unique_lock<std::mutex> lock(mtx);

        // 等待条件满足:队列非空或生产结束
        cv.wait(lock, [] { return !data_queue.empty() || finished; });

        // 检查是否结束且队列为空
        if (finished && data_queue.empty()) 
        {
            std::cout << "消费者 " << id << ": 生产者已完成,退出" << std::endl;
            break;
        }

        // 处理数据
        int value = data_queue.front();
        data_queue.pop();
        std::cout << "消费者 " << id << ": 处理数据 " << value << std::endl;
    }
}

int main() 
{
    std::thread prod(producer);
    std::thread cons1(consumer, 1);
    std::thread cons2(consumer, 2);

    prod.join();
    cons1.join();
    cons2.join();

    return 0;
}

参考输出:

Text Only
 1
 2
 3
 4
 5
 6
 7
 8
 9
10
11
12
13
14
15
16
17
18
19
20
21
22
生产者: 插入数据 1
消费者 1: 处理数据 1
生产者: 插入数据 2
消费者 1: 处理数据 2
生产者: 插入数据 3
消费者 2: 处理数据 3
生产者: 插入数据 4
消费者 1: 处理数据 4
生产者: 插入数据 5
消费者 2: 处理数据 5
生产者: 插入数据 6
消费者 1: 处理数据 6
生产者: 插入数据 7
消费者 2: 处理数据 7
生产者: 插入数据 8
消费者 1: 处理数据 8
生产者: 插入数据 9
消费者 2: 处理数据 9
生产者: 插入数据 10
消费者 1: 处理数据 10
消费者 1: 生产者已完成,退出
消费者 2: 生产者已完成,退出

案例:实现奇数偶数交替打印

C++
 1
 2
 3
 4
 5
 6
 7
 8
 9
10
11
12
13
14
15
16
17
18
19
20
21
22
23
24
25
26
27
28
29
30
31
32
33
34
35
36
37
38
39
40
41
42
43
44
std::mutex mtx;
std::condition_variable con;
bool flag = false;

void printOdd()
{
    for (int i = 1; i < 100; i += 2)
    {
        std::unique_lock<std::mutex> lock(mtx);
        while (!flag)
            con.wait(lock);

        std::cout << i << " ";

        flag = false;
        con.notify_one();
    }
}

void printEven()
{
    for (int i = 0; i < 100; i += 2)
    {
        std::unique_lock<std::mutex> lock(mtx);
        while (flag)
            con.wait(lock);

        std::cout << i << " ";

        flag = true;
        con.notify_one();
    }
}

int main()
{
    std::thread t1(printOdd);
    std::thread t2(printEven);

    t1.join();
    t2.join();

    return 0;
}

上面的代码执行流程如下:

flag初始化为false,如果t1先执行,那么此时会进入printOdd函数的循环体内部从而在lock上进行等待,此时t2线程开始执行,因为flagfalse,所以不会进入循环体,接下来打印当前的i再将flag修改为true并唤醒在当前lock下等待的另外一个线程,此时因为flagtrue,如果又是t2执行(尽管t1被唤醒,但是t1依旧需要和t2继续抢锁),那么此时t2会因为flagtrue导致进入条件变量下等待被唤醒,此时t1执行打印出当前的i

如果t2先执行,就是正常的初始执行顺序

输出结果如下:

Text Only
1
0 1 2 3 4 5 6 7 8 9 10 11 12 13 14 15 16 17 18 19 20 21 22 23 24 25 26 27 28 29 30 31 32 33 34 35 36 37 38 39 40 41 42 43 44 45 46 47 48 49 50 51 52 53 54 55 56 57 58 59 60 61 62 63 64 65 66 67 68 69 70 71 72 73 74 75 76 77 78 79 80 81 82 83 84 85 86 87 88 89 90 91 92 93 94 95 96 97 98 99

异步操作库<future>

基本概念

传统的编程模式通常是顺序执行的,即一个任务完成后才会开始下一个任务。这种模式在处理一些耗时操作(如文件读写、网络请求等)时会导致程序阻塞,降低了程序的响应性。而异步编程允许程序在执行某个耗时任务时,不等待该任务完成,而是继续执行后续的代码。当异步任务完成后,会通过某种机制通知程序获取结果,从而提高程序的并发性能

主要组件

std::future库主要由三个核心组件构成:std::futurestd::promisestd::packaged_task。它们相互协作,为异步编程提供了强大的支持,三者的介绍如下:

  • std::future:表示一个异步操作的结果。它提供了一种机制,让我们可以在异步任务完成后获取其返回值。std::future对象可以通过 std::asyncstd::promisestd::packaged_task来创建
  • std::promise:用于设置异步操作的结果。它可以与一个std::future对象关联,当std::promise设置了结果后,与之关联的std::future就可以获取这个结果
  • std::packaged_task:是一个可调用对象包装器,它将一个可调用对象(如函数、函数对象或lambda表达式)与一个std::future关联起来。当std::packaged_task被调用时,它会执行关联的可调用对象,并将结果存储在std::future

std::future的详细使用

使用std::async创建std::future

std::async是一个函数模板,它可以异步地执行一个函数,并返回一个std::future对象。std::async有两种启动策略:

  • std::launch::async:立即启动一个新线程来执行指定的函数
  • std::launch::deferred:延迟执行,直到调用std::futureget()wait()方法时才执行指定的函数

下面是一个基本的示例:

C++
 1
 2
 3
 4
 5
 6
 7
 8
 9
10
11
12
13
14
15
16
17
18
19
20
21
22
23
24
25
26
27
28
29
30
31
32
33
34
35
36
37
38
39
40
41
42
43
#include <iostream>
#include <future>
#include <mutex>

std::mutex mtx;

// 一个简单的异步任务函数
int asyncTask()
{
    std::this_thread::sleep_for(std::chrono::seconds(2));
    std::unique_lock<std::mutex> lock(mtx);
    std::cout << "Async task is running on thread: " << std::this_thread::get_id() << std::endl;
    return 42;
}

int main()
{
    // 使用 std::async 启动异步任务,采用 async 策略
    std::future<int> resultAsync = std::async(std::launch::async, asyncTask);

    // 使用 std::async 启动异步任务,采用 deferred 策略,这种情况下只会在下面调用 get 时才会执行任务
    std::future<int> resultDeferred = std::async(std::launch::deferred, asyncTask);

    {
        std::unique_lock<std::mutex> lock(mtx);
        std::cout << "Main thread is doing other things on thread: " << std::this_thread::get_id() << std::endl;
    }
    // 获取异步任务的结果
    int valueAsync = resultAsync.get();
    {
        std::unique_lock<std::mutex> lock(mtx);
        std::cout << "The result of the async task is: " << valueAsync << std::endl;
        std::cout << "=================" << std::endl;
    }
    // 由于是 deferred 策略,此时才会执行任务
    int valueDeferred = resultDeferred.get();
    {
        std::unique_lock<std::mutex> lock(mtx);
        std::cout << "The result of the deferred task is: " << valueDeferred << std::endl;
    }

    return 0;
}

参考输出如下:

Text Only
1
2
3
4
5
6
Main thread is doing other things on thread: 33860
Async task is running on thread: 21940
The result of the async task is: 42
=================
Async task is running on thread: 33860
The result of the deferred task is: 42

如果将上面的std::launch::deferred改为std::launch::async,那么参考输出结果如下:

Text Only
1
2
3
4
5
6
Main thread is doing other things on thread: 40456
Async task is running on thread: 35448
Async task is running on thread: 43272
The result of the async task is: 42
=================
The result of the deferred task is: 42

从上面的输出可以看到,使用deffered策略时,任务在调用get时才开始执行,而使用async策略时,任务会立即在新线程中执行

需要注意的是,std::async函数还有一个版本,即不需要程序员指定策略:

C++
1
2
3
template <class Fn, class... Args>
  future<typename result_of<Fn(Args...)>::type>
    async (Fn&& fn, Args&&... args);

这个版本的策略设置会根据操作系统和标准库的实现进行自动选择,建议还是使用指定策略的版本

std::future的常用方法

  • get():获取异步操作的结果。如果异步操作还未完成,该方法会阻塞当前线程,直到结果可用。需要注意的是,get()方法只能调用一次,一旦调用,std::future对象就会处于无效状态,可以通过std::future对象的成员函数valid来判断当前std::future对象是否有效
  • wait():等待异步操作完成,但不获取结果。该方法会阻塞当前线程,直到异步操作完成
  • wait_for():等待指定的时间,如果在该时间内异步操作完成,则返回结果;否则返回一个表示超时的状态std::future_status
  • wait_until():等待到指定的时间点,如果在该时间点之前异步操作完成,则返回结果;否则返回一个表示超时的状态std::future_status

下面是一个使用std::future相关函数的示例:

C++
 1
 2
 3
 4
 5
 6
 7
 8
 9
10
11
12
13
14
15
16
17
18
19
20
21
22
23
24
25
26
27
28
29
30
31
#include <iostream>
#include <future>
#include <chrono>

int task()
{
    std::this_thread::sleep_for(std::chrono::seconds(2));
    return 100;
}

int main()
{
    std::future<int> f = std::async(task);

    // 先等待1秒
    std::future_status status = f.wait_for(std::chrono::seconds(1));

    if (status == std::future_status::ready)
    {
        std::cout << "Task is ready. Result: " << f.get() << std::endl;
    }
    else if (status == std::future_status::timeout)
    {
        std::cout << "Task is not ready yet." << std::endl;
        // 继续等待直到任务完成
        f.wait();
        std::cout << "Task is now ready. Result: " << f.get() << std::endl;
    }

    return 0;
}

参考输出如下:

Text Only
1
2
Task is not ready yet.
Task is now ready. Result: 100

std::future_status类型

std::future_status是一个枚举类类型,其原型如下:

C++
1
2
3
4
5
6
enum class future_status 
{
    ready,
    timeout,
    deferred
};

这三种状态的说明如下:

std::future_status::ready:表示异步操作已经完成,结果已经准备好可以被获取

当调用std::futurewait_for()wait_until()方法时,如果在指定的时间内异步操作完成,那么这两个方法会返回std::future_status::ready。另外,当调用wait()方法时,由于该方法会阻塞直到异步操作完成,所以操作完成后,再调用wait_for()wait_until()且异步操作仍处于完成状态时,也会返回std::future_status::ready

例如下面的代码:

C++
 1
 2
 3
 4
 5
 6
 7
 8
 9
10
11
12
13
14
15
16
17
18
19
20
21
#include <iostream>
#include <future>
#include <chrono>

int asyncTask() 
{
    std::this_thread::sleep_for(std::chrono::seconds(1));
    return 42;
}

int main() 
{
    std::future<int> f = std::async(asyncTask);

    // 等待 2 秒,由于任务只需 1 秒,所以会返回 ready
    auto status = f.wait_for(std::chrono::seconds(2));
    if (status == std::future_status::ready) 
        std::cout << "Task is ready. Result: " << f.get() << std::endl;

    return 0;
}

std::future_status::timeout:表示在调用std::futurewait_for()wait_until()方法时,指定的等待时间已经过去,但异步操作尚未完成

当使用wait_for()方法并指定一个时间间隔,或者使用wait_until()方法并指定一个时间点,在这个时间间隔或时间点到达时,异步操作还没有完成,那么这两个方法会返回std::future_status::timeout

例如下面的代码:

C++
 1
 2
 3
 4
 5
 6
 7
 8
 9
10
11
12
13
14
15
16
17
18
19
20
21
#include <iostream>
#include <future>
#include <chrono>

int asyncTask() 
{
    std::this_thread::sleep_for(std::chrono::seconds(2));
    return 42;
}

int main() 
{
    std::future<int> f = std::async(asyncTask);

    // 等待 1 秒,由于任务需要 2 秒,所以会返回 timeout
    auto status = f.wait_for(std::chrono::seconds(1));
    if (status == std::future_status::timeout) 
        std::cout << "Task is not ready yet." << std::endl;

    return 0;
}

std::future_status::deferred:表示异步操作被延迟执行。当使用std::async并指定 std::launch::deferred 策略时,异步任务不会立即启动,而是会在调用std::futureget()wait()方法时才会执行

当使用std::asyncstd::launch::deferred策略启动一个异步任务,然后调用std::futurewait_for()wait_until()方法时,无论等待时间是多少,都会返回std::future_status::deferred

例如下面的代码:

C++
 1
 2
 3
 4
 5
 6
 7
 8
 9
10
11
12
13
14
15
16
17
18
19
#include <iostream>
#include <future>

int asyncTask() 
{
    return 42;
}

int main() 
{
    std::future<int> f = std::async(std::launch::deferred, asyncTask);

    // 由于使用了 deferred 策略,会返回 deferred
    auto status = f.wait_for(std::chrono::seconds(0));
    if (status == std::future_status::deferred) 
        std::cout << "Task is deferred." << std::endl;

    return 0;
}

但是,根据deffered策略的特点,一旦调用了get就会执行异步任务函数,此时异步任务就会返回结果,状态就应该会切换为ready,为了验证这一点,直接用future无法做到,因为当前的需求是调用get后查看wait_for的返回值,但是根据futureget函数的特点:一旦调用了get,那么当前的future就会失效。这里可以考虑使用std::shared_future来实现(关于std::shared_future在后面会提及,此处先了解),代码如下:

C++
 1
 2
 3
 4
 5
 6
 7
 8
 9
10
11
12
13
14
15
16
17
18
19
20
21
22
23
24
#include <iostream>
#include <future>

int asyncTask()
{
    return 42;
}

int main()
{
    std::future<int> f = std::async(std::launch::deferred, asyncTask);

    // 由于使用了 deferred 策略,会返回 deferred
    auto status = f.wait_for(std::chrono::seconds(0));
    if (status == std::future_status::deferred)
        std::cout << "Task is deferred." << std::endl;
    std::shared_future<int> sf(std::move(f));
    int ret = sf.get();
    status = sf.wait_for(std::chrono::seconds(0));
    if(status == std::future_status::ready)
        std::cout << "Task is ready:" << ret << std::endl;

    return 0;
}

输出结果如下:

C++
1
2
Task is deferred.
Task is ready42

std::promise 的介绍

std::promise用于设置异步操作的结果,它与std::future紧密配合。在std::promise中,有下面几种常见的函数:

  • get_future():用于获取与std::promise关联的std::future对象。std::future对象可以用来获取异步操作的结果
  • set_value(T value):用于设置std::promise的结果。一旦调用了set_value,与之关联的std::future就可以通过get()方法获取到这个结果
  • set_exception(std::exception_ptr ex):用于设置std::promise的异常。一旦调用了set_exception,与之关联的std::futureget()方法就会抛出这个异常
  • set_value_at_thread_exit(T value):用于设置std::promise的结果。与set_value不同的是,这个函数会在当前线程退出时设置结果
  • set_exception_at_thread_exit(std::exception_ptr ex):用于设置std::promise的异常。与set_exception不同的是,这个函数会在当前线程退出时设置异常
  • swap(std::promise& other):用于交换两个std::promise对象的内容
  • operator=(promise&& other):移动赋值操作符,用于将一个 std::promise 对象的状态移动到另一个对象,转移所有权,但是不支持复制赋值

以下是一个使用 std::promise 的示例:

C++
 1
 2
 3
 4
 5
 6
 7
 8
 9
10
11
12
13
14
15
16
17
18
19
20
21
22
23
24
25
26
27
28
29
30
31
32
33
34
35
36
37
38
39
40
41
42
#include <iostream>
#include <future>
#include <thread>

// 工作线程函数
void worker(std::promise<int>& p) 
{
    try {
        // 模拟一个耗时操作
        std::this_thread::sleep_for(std::chrono::seconds(2));
        int result = 200;
        // 设置 promise 的结果
        p.set_value(result);
    } catch (...) {
        // 如果发生异常,设置异常
        p.set_exception(std::current_exception());
    }
}

int main() 
{
    // 创建一个 promise 对象
    std::promise<int> p;
    // 获取与 promise 关联的 future 对象
    std::future<int> f = p.get_future();

    // 启动一个新线程执行工作函数
    std::thread t(worker, std::ref(p));

    try {
        // 获取异步操作的结果
        int value = f.get();
        std::cout << "The result from the promise is: " << value << std::endl;
    } catch (const std::exception& e) {
        std::cout << "Exception caught: " << e.what() << std::endl;
    }

    // 等待线程结束
    t.join();

    return 0;
}

关于set_valueset_value_at_thread_exit的区别:

  • set_value:当调用set_value时,std::promise会立即将结果设置到与之关联的std::future中,并且std::futureget()方法会立即返回结果。这意味着一旦调用了set_value,与之关联的std::future就可以立即获取到结果
  • set_value_at_thread_exit:当调用set_value_at_thread_exit时,std::promise会在当前线程退出时将结果设置到与之关联的std::future中。这意味着std::futureget()方法在当前线程退出之前不会返回结果,而是会阻塞直到当前线程退出

例如下面两个例子:

C++
 1
 2
 3
 4
 5
 6
 7
 8
 9
10
11
12
13
14
15
16
17
18
19
20
21
22
23
24
25
26
27
28
29
30
31
32
33
34
35
36
37
38
#include <iostream>
#include <future>
#include <thread>

void producer(std::promise<int> prom) 
{
    std::cout << "生产者线程开始..." << std::endl;

    // 执行一些计算
    std::this_thread::sleep_for(std::chrono::seconds(2));

    // 立即设置结果
    std::cout << "生产者设置结果..." << std::endl;
    prom.set_value(42);

    std::cout << "生产者继续执行其他工作..." << std::endl;
    std::this_thread::sleep_for(std::chrono::seconds(2));
    std::cout << "生产者线程结束" << std::endl;
}

int main() 
{
    std::promise<int> prom;
    std::future<int> fut = prom.get_future();

    std::cout << "主线程启动生产者线程..." << std::endl;
    std::thread t(producer, std::move(prom));

    // 等待结果
    std::cout << "主线程等待结果..." << std::endl;
    int value = fut.get();  // 一旦生产者调用set_value,这里就会立即返回
    std::cout << "主线程获取到结果: " << value << std::endl;
    std::cout << "注意:生产者线程可能仍在运行" << std::endl;

    t.join();

    return 0;
}
C++
 1
 2
 3
 4
 5
 6
 7
 8
 9
10
11
12
13
14
15
16
17
18
19
20
21
22
23
24
25
26
27
28
29
30
31
32
33
34
35
36
37
38
39
#include <iostream>
#include <future>
#include <thread>

void producer(std::promise<int> prom)
{
    std::cout << "生产者线程开始..." << std::endl;

    // 执行一些计算
    std::this_thread::sleep_for(std::chrono::seconds(2));

    // 设置结果,但在线程结束前不会生效
    std::cout << "生产者设置线程退出时的结果..." << std::endl;
    prom.set_value_at_thread_exit(42);

    std::cout << "生产者继续执行其他工作..." << std::endl;
    std::this_thread::sleep_for(std::chrono::seconds(2));
    std::cout << "生产者线程即将结束,结果才会被实际传递" << std::endl;
    // 当函数返回时,线程结束,结果才会被设置
}

int main()
{
    std::promise<int> prom;
    std::future<int> fut = prom.get_future();

    std::cout << "主线程启动生产者线程..." << std::endl;
    std::thread t(producer, std::move(prom));

    // 等待结果
    std::cout << "主线程等待结果..." << std::endl;
    int value = fut.get(); // 会阻塞直到生产者线程完全结束
    std::cout << "主线程获取到结果: " << value << std::endl;
    std::cout << "此时生产者线程已经结束" << std::endl;

    t.join();

    return 0;
}

输出结果分别如下:

C++
1
2
3
4
5
6
7
8
主线程启动生产者线程...
主线程等待结果...
生产者线程开始...
生产者设置结果...
生产者继续执行其他工作...
主线程获取到结果: 42
注意生产者线程可能仍在运行
生产者线程结束
C++
1
2
3
4
5
6
7
8
主线程启动生产者线程...
主线程等待结果...
生产者线程开始...
生产者设置线程退出时的结果...
生产者继续执行其他工作...
生产者线程即将结束结果才会被实际传递
主线程获取到结果: 42
此时生产者线程已经结束

需要注意,如果在Visual Studio中使用set_value_at_thread_exit,可能会出现程序崩溃,可以考虑使用引用的方式传递std::promise对象:

C++
 1
 2
 3
 4
 5
 6
 7
 8
 9
10
11
12
13
14
15
16
17
// ...

void producer(std::promise<int> &prom) 
{
    // ...
}

int main() 
{
    std::promise<int> prom;
    std::future<int> fut = prom.get_future();

    std::cout << "主线程启动生产者线程..." << std::endl;
    std::thread t(producer, std::ref(prom));

    // ...
}

std::packaged_task的介绍

std::packaged_task可以将一个可调用对象与一个std::future关联起来。常见函数如下:

  • get_future():返回一个与std::packaged_task关联的std::future对象。借助该std::future对象,其他线程能够获取std::packaged_task执行后的结果
  • operator():调用std::packaged_task所封装的可调用对象,并且把结果存储在与之关联的std::future对象里
  • valid():检查std::packaged_task是否与一个有效的可调用对象相关联。若关联则返回true,反之返回false
  • reset():重置std::packaged_task对象,让它能够再次被调用。重置后,它会和一个新的未完成状态的std::future关联
  • swap():交换两个std::packaged_task对象的状态

以下是一个使用std::packaged_task的示例:

C++
 1
 2
 3
 4
 5
 6
 7
 8
 9
10
11
12
13
14
15
16
17
18
19
20
21
22
23
24
25
26
27
28
29
30
#include <iostream>
#include <future>
#include <thread>

// 一个简单的任务函数
int taskFunction(int a, int b) 
{
    return a + b;
}

int main() 
{
    // 创建一个 packaged_task 对象
    std::packaged_task<int(int, int)> task(taskFunction);

    // 获取与 packaged_task 关联的 future 对象
    std::future<int> f = task.get_future();

    // 启动一个新线程执行 packaged_task
    std::thread t(std::move(task), 3, 5);

    // 获取异步操作的结果
    int result = f.get();
    std::cout << "The result of the task is: " << result << std::endl;

    // 等待线程结束
    t.join();

    return 0;
}

从上面的例子可以看出,实际上std::packaged_task+std::thread可以理解为std::async的一种底层实现方式

futurepromiseasyncpackaged_task之间的关系和区别

组件 与其他组件的关系 区别
std::promise 可通过get_future()方法创建std::future对象,将结果设置给std::promise后,与之关联的std::future能获取结果,可在新线程里为std::promise设置结果,与std::async一样用于实现异步操作 重点在于设置结果,自身不直接执行任务,要搭配线程或其他可执行体来完成任务,所以灵活性高,能自定义任务执行逻辑
std::async 调用后返回std::future对象,借助该对象获取异步任务结果,内部或许会运用std::promisestd::packaged_task来实现异步操作 简化异步任务启动流程,可快速让任务异步执行,提供std::launch::asyncstd::launch::deferred两种启动策略
std::future 可由std::promiseget_future()方法、std::async函数、std::packaged_taskget_future()方法创建,作为获取异步操作结果的接口,与std::promisestd::asyncstd::packaged_task协同工作 主要用于获取结果,不负责任务执行和结果设置,提供get()wait()wait_for()wait_until()等方法来管理异步操作状态
std::packaged_task 关联一个可调用对象与std::future,调用std::packaged_task时,会执行关联的可调用对象并把结果存于std::future中,可像普通可调用对象那样在线程里执行,类似std::async能执行任务 强调将可调用对象封装成异步任务,需手动管理线程和执行,能复用可调用对象,多次调用std::packaged_task可执行多次任务

std::shared_future的介绍

std::shared_future是C++11标准库中用于异步编程的一个模板类,它是std::future的扩展版本。在std::future中,get()方法只能被调用一次,调用后std::future对象就会处于无效状态,这意味着std::future不支持多个线程同时访问异步操作的结果。而std::shared_future则允许将异步操作的结果共享给多个线程,多个线程可以同时或先后调用get()方法来获取结果

创建std::shared_future

std::shared_future通常由std::future转换而来。可以通过调用std::futureshare()方法来创建一个std::shared_future对象。以下是一个简单的示例:

C++
 1
 2
 3
 4
 5
 6
 7
 8
 9
10
11
12
13
14
15
16
#include <iostream>
#include <future>

int asyncTask() 
{
    return 42;
}

int main() 
{
    std::future<int> f = std::async(asyncTask);
    std::shared_future<int> sf = f.share();

    std::cout << "Result from shared_future: " << sf.get() << std::endl;
    return 0;
}

除了通过share()方法获取到shared_future对象外,也可以通过直接构造函数来创建std::shared_future对象:

C++
1
2
// 构造一个空的shared_future对象
std::shared_future<int> sf;

std::shared_future的常用方法

std::shared_future 提供了与std::future类似的方法,用于获取异步操作的结果和管理状态:

  • get():获取异步操作的结果。与std::future不同的是,std::shared_futureget()方法可以被多次调用,每次调用都会返回相同的结果
  • wait():等待异步操作完成,但不获取结果
  • wait_for():等待指定的时间,如果在该时间内异步操作完成,则返回结果;否则返回一个表示超时的状态
  • wait_until():等待到指定的时间点,如果在该时间点之前异步操作完成,则返回结果;否则返回一个表示超时的状态

多线程共享结果示例

下面的示例展示了如何在多个线程中共享std::shared_future的结果:

C++
 1
 2
 3
 4
 5
 6
 7
 8
 9
10
11
12
13
14
15
16
17
18
19
20
21
22
23
24
25
26
27
28
#include <iostream>
#include <future>
#include <thread>

int asyncTask() 
{
    return 100;
}

void printResult(std::shared_future<int> sf) 
{
    std::cout << "Result in thread: " << sf.get() << std::endl;
}

int main() 
{
    std::future<int> f = std::async(asyncTask);
    std::shared_future<int> sf = f.share();

    std::thread t1(printResult, sf);
    std::thread t2(printResult, sf);

    t1.join();
    t2.join();

    std::cout << "Result in main: " << sf.get() << std::endl;
    return 0;
}

使用并发支持库实现简易的线程池

下面是一个使用并发支持库实现简易线程池的示例:

C++
  1
  2
  3
  4
  5
  6
  7
  8
  9
 10
 11
 12
 13
 14
 15
 16
 17
 18
 19
 20
 21
 22
 23
 24
 25
 26
 27
 28
 29
 30
 31
 32
 33
 34
 35
 36
 37
 38
 39
 40
 41
 42
 43
 44
 45
 46
 47
 48
 49
 50
 51
 52
 53
 54
 55
 56
 57
 58
 59
 60
 61
 62
 63
 64
 65
 66
 67
 68
 69
 70
 71
 72
 73
 74
 75
 76
 77
 78
 79
 80
 81
 82
 83
 84
 85
 86
 87
 88
 89
 90
 91
 92
 93
 94
 95
 96
 97
 98
 99
100
101
102
103
104
105
106
107
108
109
110
111
112
113
114
115
116
117
118
119
120
121
122
123
124
#include <iostream>
#include <vector>
#include <queue>
#include <memory>
#include <thread>
#include <mutex>
#include <condition_variable>
#include <future>
#include <functional>
#include <stdexcept>

class ThreadPool 
{
public:
    // 构造函数,初始化线程池
    ThreadPool(size_t threads) : stop(false) 
    {
        for (size_t i = 0; i < threads; ++i) 
        {
            // 给线程池添加线程,使用lambda表达式创建线程
            workers.emplace_back([this] 
            {
                while (true) 
                {
                    std::function<void()> task;
                    {
                        std::unique_lock<std::mutex> lock(this->queue_mutex);
                        // 如果线程池停止或者任务队列为空,则等待
                        // 注意带有谓词函数的执行逻辑
                        this->condition.wait(lock, [this] { return this->stop || !this->tasks.empty(); });

                        // 如果线程池停止且任务队列为空,则退出线程
                        if (this->stop && this->tasks.empty())
                            return;
                        // 取出队头任务
                        task = std::move(this->tasks.front());
                        this->tasks.pop();
                    }

                    // 执行任务
                    task();
                }
            });
        }
    }

    // 析构函数,停止线程池
    ~ThreadPool() 
    {
        {
            std::unique_lock<std::mutex> lock(queue_mutex);
            stop = true;
        }
        condition.notify_all();
        for (std::thread &worker : workers) 
            worker.join();
    }

    // 向线程池添加任务
    template<class F, class... Args>
    auto enqueue(F &&f, Args &&... args) 
        -> std::future<typename std::result_of<F(Args...)>::type> 
    {
        // 获取到返回值
        using return_type = typename std::result_of<F(Args...)>::type;

        // 包装任务到packaged_task中,使用std::bind绑定参数使得有参或者无参任务都可以被调用
        auto task = std::make_shared< std::packaged_task<return_type()> >(
                std::bind(std::forward<F>(f), std::forward<Args>(args)...)
        );

        // 获得任务的future
        std::future<return_type> res = task->get_future();
        {
            std::unique_lock<std::mutex> lock(queue_mutex);
            if (stop)
                throw std::runtime_error("enqueue on stopped ThreadPool");
            tasks.emplace([task]() { (*task)(); });
        }
        condition.notify_one();
        return res;
    }

private:
    // 工作线程集合
    std::vector<std::thread> workers;
    // 任务队列
    std::queue<std::function<void()>> tasks;

    // 同步原语
    std::mutex queue_mutex;
    std::condition_variable condition;
    bool stop;
};

// 用于输出的互斥锁
std::mutex cout_mtx;
// 测试函数
void testFunction(int id)
{
    {
        std::unique_lock<std::mutex> lock(cout_mtx);
        std::cout << "Task " << id << " is running on thread " << std::this_thread::get_id() << std::endl;
        std::this_thread::sleep_for(std::chrono::seconds(1));
        std::cout << "Task " << id << " is finished." << std::endl;
    }
}

int main() 
{
    // 创建一个包含 4 个线程的线程池
    ThreadPool pool(4);

    // 向线程池添加任务
    std::vector< std::future<void> > futures;
    for (int i = 0; i < 8; ++i) 
        futures.emplace_back(pool.enqueue(testFunction, i));

    // 等待所有任务完成
    for (auto &future : futures) 
        future.wait();

    return 0;
}    

参考输出结果:

Text Only
 1
 2
 3
 4
 5
 6
 7
 8
 9
10
11
12
13
14
15
16
Task 0 is running on thread 27024
Task 0 is finished.
Task 4 is running on thread 27024
Task 4 is finished.
Task 2 is running on thread 47348
Task 2 is finished.
Task 3 is running on thread 46656
Task 3 is finished.
Task 1 is running on thread 47936
Task 1 is finished.
Task 5 is running on thread 27024
Task 5 is finished.
Task 6 is running on thread 47348
Task 6 is finished.
Task 7 is running on thread 46656
Task 7 is finished.